I like system programming which can allow you to touch more software development skills in the bottom level.
Linux is the perfect platform when you want to do system programming. But if you’re using a computer running Windows on it, then you have to spend some time to set up the Linux development environment. Generally speaking there are two traditional ways to do that: virtual machine and dualboot, both need some effort. Or you can try to do that with container technology, for example, I once shared one article about how to do it with Docker.
In this article, I will introduce a new and easier way to do this without too much overhead.
Windows Subsystem for Linux
The new way is Windows Subsystem for Linux (WSL). I have to admit that the operating system is complex and difficult so for now I don’t know how Microsoft make WSL works. In details, you can refer to this article to learn how WSL allows Windows to access Linux files. In this article let’s focus on how to set it up and what kind of benefits it can provide to developers.
Install additional software using your own GNU/Linux distribution package manager.
With these conditions, you can set up a completed Linux development environment.
Install WSL
For detail steps to install WSL, you can find it on the official document. Based on my experience, I follow the document to download and install Linux Ubuntu distribution smoothly, which is much easier than settig the virtual machine.
File mount
By default, you can also access your local machine’s file system from within the Linux Bash shell. Since your local drives are mounted under the /mnt folder of the subsystem.
In this way, you can develop the code with the productivity tools in Windows and build it in Linux environment.
Network
This is another convenient point. WSL shares the IP address of Windows, as it is running on Windows. As such you can access any ports on localhost e.g. if you had a web server running on port 8080, you could access it just by visiting http://localhost:8080 into your Windows browser.
Set up the development environment
After install the Ubuntu system, I also install tools to prepare the development environment. For example, GCC to develop C language program as below.
Summary
Based on my testing and experience, WSL can save developers’ time to set up Linux environment.
HTTP is everywhere. As a software engineer, you’re using the HTTP protocol every day. Starting an HTTP server will be an easy task if you’re using any modern language or framework. For example, in Golang you can do that with the following lines of code:
1
2
3
4
5
6
7
8
9
10
11
12
13
14
package main
import ( "fmt" "net/http" )
funcmain() { http.HandleFunc("/hi", func(w http.ResponseWriter, r *http.Request){ fmt.Fprintf(w, "Hi") })
log.Fatal(http.ListenAndServe(":8081", nil)) }
You can finish the job easily because net/http package implements the HTTP protocol completely. How can you do that without net/http package ? That’s the target of this article.
Note: This article is inspired by Joe Schafer’s post a lot. My implementation has something different which totally removes dependency on Golang’s net package, but the idea of using system call in Golang to setup the TCP/IP connetion is the same. Thanks very much for Joe Schafer’s interesting post.
Another thing I need to mention is this article will cover many concepts, but it’s very difficult to discuss all of them in detail. To understand this article smoothly, you need some prerequisite knowledge such as OSI model, TCP/IP stack, socket programming, HTTP protocol and system call. I will add some explanations on these topics to help you understand this article and give some references and links to let you continue exploring more in advanced level.
OSI network model
OSI model partitions the data flow in a communication system into seven abstraction layers. These layers form a protocol stack, with each layer communicating with the layer above and the layer below as follows:
For example, HTTP is in layer 7, TCP is in layer 4 and IP is in layer 3.
OSI is a general model, which was first specified in the early 1980s. But neither traditional nor modern networking protocols fit into this model neatly. For example, TCP/IP stack does not define the three upper layers: session, presentation, and application. In fact, it does not define anything above the transport layer. From the viewpoint of TCP/IP, everything above the transport layer is part of the application. So the layered network model more consistent with Linux (TCP/IP stack is implemented in Linux kernel) is as follows:
Application Layer (telnet, ftp, http)
Host-to-Host Transport Layer (TCP, UDP)
Internet Layer (IP and routing)
Network Access Layer (Ethernet, wi-fi)
Once again, it is important to point out that the upper layers—Layers 5, 6, and 7—are not part of the TCP/IP stack.
Another critical point to understand is data encapsulation. The data flow goes from the bottom physical level to the highest-level representation of data in an application.
Each layer has administrative information that it has to keep about its own layer. It does this by adding header information to the packet it receives from the layer above, as the packet passes down. Each header contains information regarding the message contents. For example, one HTTP server sends data from one host to another. It uses the TCP protocol on top of the IP protocol, which may be sent over Ethernet. This looks like:
The packet transmitted over ethernet, is the bottom one. On the receiving side, these headers are removed as the packet moves up.
Next let’s see how TCP/IP stack encapsulates HTTP message and send it over the network through socket. The idea can be illustrated with the following image:
I will explain how it works by writing a HTTP server from scratch, you can refer to this Github repo to get all the code.
TCP/IP
TCP/IP stack is originated from ARPANET project, which is integrated into Unix BSD OS as the first implementation of TCP/IP protocols.
Nowadays, TCP/IP is still implemented in the operating system level. For Linux system, you can find the source code inside the kernel. The detailed implementation is outside the scope of this article. You can study it in this Github link.
Socket
As I mentioned in the above sections, HTTP server is running in the application level. How it can work with TCP/IP stack which lives in the kernel? The answer is socket.
The socket interface was originally developed as part of the BSD operating system. Sockets provide an interface between the application level programs and the TCP/IP stack. Linux (or other OS) provides an API and sockets, and applications use this API to access the networking facilities in the kernel.
The socket interface is really TCP/IP’s window on the world. In most modern systems incorporating TCP/IP, the socket interface is the only way that applications make use of the TCP/IP suite of protocols.
One main advantage of sockets in Unix or Linux system is that the socket is treated as a file descriptor, and all the standard I/O functions work on sockets in the same way they work on a local file. File descriptor is simply an integer associated with an open file.
You may heard everything in Unix is a file. The file can be a network connection, a pipe, a real file in the disk, a device or anything else. So when you want to send data to another program over the Interent you will do it through a file descriptor.
In our HTTP server case, it will get the request by reading data from the socket and send the response by writing data to the socket.
Next, let’s review the source code to see how the HTTP server is implemented.
First, we need setup the TCP connection through socket, the process can be described in the following image:
In Golang, net package provides all the socket related functionalities. Since this article’s purpose is writing a HTTP server from scratch, so I create a package named simplenet to provide the very basic implementation.
// Bind the socket to a port sa := &syscall.SockaddrInet4{Port: port} copy(sa.Addr[:], ip) if err = syscall.Bind(fd, sa); err != nil { returnnil, os.NewSyscallError("bind", err) }
// Listen for incoming connections. if err = syscall.Listen(fd, syscall.SOMAXCONN); err != nil { returnnil, os.NewSyscallError("listen", err) }
return &netSocket{fd: fd}, nil }
func(ns netSocket) Read(p []byte) (int, error) { iflen(p) == 0 { return0, nil } n, err := syscall.Read(ns.fd, p) // read from socket file descriptor if err != nil { n = 0 } return n, err }
func(ns netSocket) Write(p []byte) (int, error) { n, err := syscall.Write(ns.fd, p) // write to socket file descriptor if err != nil { n = 0 } return n, err }
// Creates a new netSocket for the next pending connection request. func(ns *netSocket) Accept() (*netSocket, error) { // syscall.ForkLock doc states lock not needed for blocking accept. nfd, _, err := syscall.Accept(ns.fd) if err == nil { syscall.CloseOnExec(nfd) } if err != nil { returnnil, err } return &netSocket{nfd}, nil }
netSocket data model is created to represent the socket, which contains only one field fd means file descriptor. And all the socket related APIs: Read, Write, Accept and Close, are defined. The usage of socket API is not in this article’s scope, you can easily find a lot of great documents about it online.
The logic of netSocket is not complicated, because it delegates the job to the kernel by system call. A system call is a programmatic way a program requests a service from the kernel, in detail you can refer to this article. In Golang, all the system calls are wrapped inside the syscall standard package.
One thing need to mention is different platform have different syscall usages, so the demo code shown in this article can only be compiled and build on Linux system.
Now we setup the TCP server and wait for connection request from client side. Next, let’s see how to read or write HTTP request and response through socket.
funcmain() { ipFlag := flag.String("ip_addr", "127.0.0.1", "The IP address to use") portFlag := flag.Int("port", 8080, "The port to use.") flag.Parse()
ip := simplenet.ParseIP(*ipFlag) port := *portFlag socket, err := simplenet.NewNetSocket(ip, port) defer socket.Close() if err != nil { panic(err) }
type request struct { method string// GET, POST, etc. header simpleTextProto.MIMEHeader body []byte uri string// The raw URI from the request proto string// "HTTP/1.1" }
funcParseRequest(c *netSocket) (*request, error) { b := bufio.NewReader(*c) tp := simpleTextProto.NewReader(b) // need replace req := new(request)
// Parse request line: parse "GET /index.html HTTP/1.0" var s string s, _ = tp.ReadLine() // need replace sp := strings.Split(s, " ") req.method, req.uri, req.proto = sp[0], sp[1], sp[2]
The HTTP request message can be divided into three parts request line, request headers and request body as follows:
The logic inside ParseRequest handles these 3 parts step by step. You can refer to the comments in the demo code.
One thing need to emphasis is that ParseRequest method doesn’t depends on net package. Because I want to show how HTTP server works in the bottom level, so I copy the request parsing logics from net package into my simplenet package. The parsing for request header part is kind of complex, but it doesn’t influence your understanding about the main concept of HTTP server. If you want to know the details, you can refer to the simplenet/simpleTextProto package. The important thing to understand is HTTP server reads the request message with Read method of netSocket . And the Read method makes socket read system call to get network data from TCP stack:
1
syscall.Read(ns.fd, p)
On the other side, HTTP response is sent back by calling WriteString method of simplenet package
When you want to do the load performance test to your HTTP backend service, a handy and powerful tool can make your job much easier. For example, ApacheBench (short for ab) is widely used in this field. But it is not today’s topic. Instead, I want to introduce Hey written in Golang and supports the same functionality as ab.
Hey usage goes as follows:
1 2 3 4 5 6 7 8 9 10 11 12
Usage: hey [options...] <url>
Options: -n Number of requests to run. Default is 200. -c Number of workers to run concurrently. Total number of requests cannot be smaller than the concurrency level. Default is 50. -q Rate limit, in queries per second (QPS) per worker. Default is no rate limit. -z Duration of application to send requests. When duration is reached, application stops and exits. If duration is specified, n is ignored. Examples: -z 10s -z 3m. ... // other options are hidden
I didn’t list all of the options but only show several related to this article’s content. As you can see in the above list, Hey can support different practical features, such as multiple workers to run in the concurrent style and rate limit by queries per second (QPS). It can also support run by duration and run by request number two modes.
In this article, we can review the design and implementation of Hey to see how to make a load performance testing tool.
Architecture Design
The design of Hey is not complex, and the architecture can be divided into the following three parts:
Control logic: the main workflow like how to set up multiple concurrent workers, how to control QPS rate limiter, and how to exit the process when duration is reached;
HTTP request configuration: the headers or parameters needed to send request;
Test report: print or save the result after the load testing finish.
The architecture diagram goes as follows, after reading this article you’ll understand every element in this diagram:
This article will focus on the first item (since it is the real interesting part) to show how to use Golang‘s concurrent programming techniques to realize these features.
Exit the process
In the hey.go file, you can find the entry point main function. Let’s hide the boilerplate code and review the core logic in the main function as follows:
w := &requester.Work{ N: num, // number of request C: conc, // number of concurrent works QPS: q, // QPS setting results chan *result, // channel for request response stopCh chanstruct{}, // channle for stop the worker // hide the other fields } w.Init()
c := make(chan os.Signal, 1) signal.Notify(c, os.Interrupt) gofunc() { <-c w.Stop() }() // if the duration is set, then launch another goroutine if dur > 0 { gofunc() { time.Sleep(dur) w.Stop() }() } w.Run()
requester.Work struct contains all the option settings, including request numbers, concurrent workers, and QPS (it also contains the test result report).
After creating an instance of requester.Work, then call the Init() method.
Init() method will initialize two channel: results and stopCh. results channel is used for request response communication. And stopCh channel is used for signal to stop the concurrent workers.
Note that there are two ways to exit from the program. The first one is the user manually stops the program, for example, by pressing ctrl + c. In this case, the signal.Notify() method from the std library can catch the signal to terminate the process. The second one is by the time duration option. Both of the process exiting logics are running in a Goroutine.
To stop the worker, Stop() method will be called:
1 2 3 4 5 6
func(b *Work) Stop() { // Send stop signal so that workers can stop gracefully. for i := 0; i < b.C; i++ { b.stopCh <- struct{}{} } }
What it does is sending several values to the stopCh channel. Note that it sends b.C values to the channel, which is the same as the number of concurrent workers.
You can imagine that each worker should wait for the value from the stopCh channel. When the worker receives one value, it should stop sending requests. Right? Then in this way, I can stop all the concurrent workers. Let’s check our guess in the following sections.
Concurrent Workers
In the above main function, you can see that Run() is called:
1 2 3 4 5 6 7 8 9 10 11
func(b *Work) Run() { b.Init() b.start = now() b.report = newReport(b.writer(), b.results, b.Output, b.N) // Run the reporter first, it polls the result channel until it is closed. gofunc() { runReporter(b.report) }() b.runWorkers() b.Finish() }
There are several points worthy of discussion. In this section, let’s review runWorkers(). And runReporter() and Finish() are related to test result reports, and we will revisit them later in this article.
runWorkers() goes as follows:
1 2 3 4 5 6 7 8 9 10 11 12 13 14 15 16
func(b *Work) runWorkers() { var wg sync.WaitGroup wg.Add(b.C)
client := &http.Client{ // hide details }
for i := 0; i < b.C; i++ { gofunc() { b.runWorker(client, b.N/b.C) wg.Done() }() } wg.Wait() // block here before all workers stop }
This is a very typical pattern to launch multiple goroutine via sync.WaitGroup. Each worker is created by calling b.runWorker in a goroutine. In this way, multiple concurrent workers can run together.
Note that before all workers finish their tasks, wg.Wait() will block Finish() to run, which is used to report test results. And we will talk about it in the following sections.
Next step, the logic goes into runWorker method, and let’s review how QPS rate limit works?
QPS
The core code of runWorker goes as follows:
1 2 3 4 5 6 7 8 9 10 11 12 13 14 15 16 17 18
func(b *Work) runWorker(client *http.Client, n int) { var throttle <-chan time.Time if b.QPS > 0 { throttle = time.Tick(time.Duration(1e6/(b.QPS)) * time.Microsecond) } ... // hide some detail codes for i := 0; i < n; i++ { select { case <-b.stopCh: // receive worker stop signal from stopCh channel return default: if b.QPS > 0 { <-throttle // receive timer signal from QPS rate limite channel } b.makeRequest(client) } } }
The first parameter of method runWorker is client for sending requests. We need more analysis about the second parameter n denoting the number of requests this worker needs to send out. When runWorker is called, b.N/b.C is passed to it. b.N is the total number of request need to be sent out, and b.C is the number of concurrent workers. b.N divided by b.C is just the number of requests for each worker. Right?
But if the user sets the duration option, what is the number of requests? You can find the following logic in the main entry function:
1
2
3
4
5
6
if dur > 0 { num = math.MaxInt32 // use MaxInt32 if conc <= 0 { usageAndExit("-c cannot be smaller than 1.") } }
When the user sets duration option, the request number will be math.MaxInt32. In this method, Hey can combine run by duration and run by request number two modes together.
As we mentioned in the introduction part, Hey can support QPS rate limit, and this strategy is written inside the runWorker method. Note that a receive-only channelthrottle is created with time.Tick, which sends out a value in each time period. And the time period is defined by
1
time.Duration(1e6/(b.QPS)) * time.Microsecond
For example, QPS = 1000, then the time period is 100ms, every 100ms throttle channel will receive a value.
throttle is placed before makeRequest() call, and in this way, we can realize the rate limit effect.
Stop Worker
In the runWorker method, you can also see the select and case usage.
1 2 3 4 5
select { case <-b.stopCh: // receive worker stop signal from stopCh channel return // hide other code }
As we mentioned in the above section, stopCh channel is used to stop the worker. Right? Now you can see how it is implemented. It maps to the Stop method we reviewed above as follows:
1 2 3 4
// Send stop signal so that workers can stop gracefully. for i := 0; i < b.C; i++ { b.stopCh <- struct{}{} }
b.C numbers of value are sent to stopCh channel, and there are b.C numbers of concurrent workers as well. Each worker can receive one value from the channel and stop running.
Result Report
Let’s also have a quick review of how the result report work. Firstly in the makeRequest method, each request’s result is sent to the results channel as follows:
And in the runReporter method, you can see the logic like this:
1 2 3 4 5 6 7 8
funcrunReporter(r *report) { // b.results is assign to r.results in newReport() constructor for res := range r.results { // receive result from results channel // append result to report struct // hide details } r.done <- true// send value done channel }
In this case, a for is used to receive all the values from the channel. Note that the loop will continue until the channel is closed. It is another very typical concurrent programming pattern in Golang. We can realize the same functionality by using select case pattern, as long as we can add one more channel to send the exit signal. But on the syntax level, for loop pattern is much more cleaner.
So there must be one place where the channel is closed, or else the deadlock issue will occur. In detail, you can refer to my previous article for more advanced explanations.
The channel is closed in the Finish method like this:
1 2 3 4 5 6 7
func(b *Work) Finish() { close(b.results) total := now() - b.start // Wait until the reporter is done. <-b.report.done b.report.finalize(total) }
Please also note that how the done channel works. Finish method firstly close the results channel, then the for loop will break and r.done <- true can have chance to run. Finally b.report.finalize() can print the result since <-b.report.done is not blocked. t
Summary
In this article, I show you how to write a load performance testing CLI tool by reviewing Hey as an example. In the code level we discussed several concurrent programming patterns provided by Golang. Concurrent(or parallel) programming is difficult, and Golang is build just for that. Keep practice.
In the previous article, we reviewed the max concurrent request number service degradation strategy. But some detailed techniques are not explained very clearly, which will be talked about in this article. And we will analyze timeout strategy as well.
Timeout
Compared with max concurrent request number strategy, timeout is very straightforward to understand.
As we mentioned in the previous article, the core logic of hystrix is inside the GoC function. GoC function internally runs two goroutines. You already see that the first goroutine contains the logic to send request to the target service and the strategy of max concurrent request number. How about the second goroutine? Let’s review it as follows:
select { case <-cmd.finished: // returnOnce has been executed in another goroutine case <-ctx.Done(): returnOnce.Do(func() { returnTicket() cmd.errorWithFallback(ctx, ctx.Err()) reportAllEvent() }) return case <-timer.C: returnOnce.Do(func() { returnTicket() cmd.errorWithFallback(ctx, ErrTimeout) reportAllEvent() }) return } }()
Note that A Timer is created with the timeout duration value from the settings. And a select statement lets this goroutine wait until one case condition receives value from the channel. The timeout case is just the 3nd one (when the first two cases are not triggered), which will run fallback logic with ErrTimeout error message.
So far you should be clear about the main structure and functionalities of these two goroutines. But in detail, there are two Golang techniques need your attention: sync.Once and sync.Cond.
sync.Once
You may already notice the following code block, which is repeated several times inside GoC function.
1 2 3 4 5
returnOnce.Do(func() { returnTicket() cmd.errorWithFallback(ctx, ErrTimeout) // with various error types reportAllEvent() })
returnOnce is type of sync.Once, which makes sure that the callback function of Do method only runs once among different goroutines.
In this specific case, it can guarantee that both returnTicket() and reportAllEvent() execute only once. This really makes sense, because if returnTicket() runs multiple times for one GoC call, then the current concurrent request number will not be correct, right?
I wrote another article about sync.Once in detail, you can refer to that article for more in-depth explanation.
sync.Cond
The implementation of returnTicket function goes as follows:
1 2 3 4 5 6 7 8 9 10
ticketCond := sync.NewCond(cmd) ticketChecked := false returnTicket := func() { cmd.Lock() for !ticketChecked { ticketCond.Wait() // hang the current goroutine } cmd.circuit.executorPool.Return(cmd.ticket) cmd.Unlock() }
ticketCond is a condition variable, and in Golang it is type of sync.Cond.
Condition variable is useful in communication between different goroutines. Concretely, Wait method of sync.Condwill hung the current goroutine, and Signal method will wake up the blocking goroutine to continue executing.
In hystrix case , when ticketChecked is false, which means the current GoC call is not finished and the ticket should not be returned yet. So ticketCond.Wait() is called to block this goroutine and wait until the GoC call is completed which is notified by Signal method.
1 2
ticketChecked = true ticketCond.Signal()
Note that the above two lines of code are always called together. ticketChecked is set to true means that the current GoC call is finished and the ticket is ready to return. Moreover, the Wait method to hang the goroutine is placed inside a for loop, which is also a best practise technique.
For more explanation about sync.Cond, please refer to my another article.
Fallback
Finally, let’s see how fallback function is called when the target service is not responsive.
Let’s recall that each GoC call will create a new command instance. And fallback function will be assigned to the field with the same name, which will be used later.
errorWithFallback method will run the fallback by calling tryFallback and report the metric events such as fallback-failure and fallback-success(will discuss metric collection in next article).
1 2 3 4 5 6 7 8 9 10 11 12 13 14
func(c *command) tryFallback(ctx context.Context, err error) error { if c.fallback == nil { return err } fallbackErr := c.fallback(ctx, err) // execute the fallback logic here if fallbackErr != nil { c.reportEvent("fallback-failure") return fmt.Errorf("fallback failed with '%v'. run error was '%v'", fallbackErr, err) }
c.reportEvent("fallback-success")
returnnil }
Summary
In this article, we talked about the timeout strategy which is the simplest one among all the strategies provided by hystrix. Some detailed Golang techniques are reviewed as well to have a better understand the complex code logic.
In the next article let’s see how to collect metrics in hystrix to realize the error rate strategy.
In the second article of this series, I will review the source code of hystrix-go project to understand how to design a circuit breaker and how to implement it with Golang.
If you’re not familiar with circuit breaker pattern or hystrix-go project, please check my previous article about it.
Three service degradation strategies
Hystrix provides three different service degradation strategies to avoid the cascading failure happening in the entire system: timeout, maximum concurrent request numbers and request error rate.
timeout: if the service call doesn’t return response successfully within a predefined time duration, then the fallback logic will run. This strategy is the simplest one.
maximum concurrent request numbers: when the number of concurrent requests is beyond the threshold, then the fallback logic will handle the following request.
request error rate: hystrix will record the response status of each service call, after the error rate reaches the threshold, the breaker will be open, and the fallback logic will execute before the breaker status changes back to closed. error rate strategy is the most complex one.
This can be seen from the basic usage of hystrix as follows:
hystrix.Go("my_command", func()error { // talk to dependency services returnnil }, func(err error)error { // fallback logic when services are down returnnil })
In the above usage case, you can see that timeout is set to 10 seconds, the maximum request number is 100, and the error rate threshold is 25 percentages.
In the consumer application level, that’s nearly all of the configuration you need to setup. hystrix will make the magin happen internally.
In this series of articles, I plan to show you the internals of hystrix by reviewing the source code.
Let’s start from the easy ones: max concurrent requests and timeout. Then move on to explore the complex strategy request error rate.
GoC
Based on the above example, you can see Go function is the door to the source code of hystrix, so let’s start from it as follows:
name: the command name, which is bound to the circuit created inside hystrix.
run: a function contains the normal logic which send request to the dependency service.
fallback: a function contains the fallback logic.
Go function just wraps run and fallback with Context, which is used to control and cancel goroutine, if you’re not familiar with it then refer to my previous article. Finally it will call GoC function.
funcGoC(ctx context.Context, name string, run runFuncC, fallback fallbackFuncC)chanerror { // construct a new command instance cmd := &command{ run: run, fallback: fallback, start: time.Now(), errChan: make(chanerror, 1), finished: make(chanbool, 1), } // get circuit by command name circuit, _, err := GetCircuit(name) if err != nil { cmd.errChan <- err return cmd.errChan } cmd.circuit = circuit //declare a condition variable sync.Cond: ticketCond, to synchronize among goroutines //declare a flag variable: ticketChecked, work together with ticketCond ticketCond := sync.NewCond(cmd) ticketChecked := false // declare a function: returnTicket, will execute when a concurrent request is done to return `ticket` returnTicket := func() { cmd.Lock() for !ticketChecked { ticketCond.Wait() } cmd.circuit.executorPool.Return(cmd.ticket) cmd.Unlock() } // declare a sync.Once instance: returnOnce, make sure the returnTicket function execute only once returnOnce := &sync.Once{}
// declare another function: reportAllEvent, used to collect the metrics reportAllEvent := func() { err := cmd.circuit.ReportEvent(cmd.events, cmd.start, cmd.runDuration) if err != nil { log.Printf(err.Error()) } } // launch a goroutine which executes the `run` logic gofunc() { deferfunc() { cmd.finished <- true }()
select { case <-cmd.finished: case <-ctx.Done(): returnOnce.Do(func() { returnTicket() cmd.errorWithFallback(ctx, ctx.Err()) reportAllEvent() }) return case <-timer.C: returnOnce.Do(func() { returnTicket() cmd.errorWithFallback(ctx, ErrTimeout) reportAllEvent() }) return } }()
return cmd.errChan }
I admit it’s complex, but it’s also the core of the entire hystrix project. Be patient, let’s review it bit by bit carefully.
First of all, the code structure of GoC function is as follows:
Construct a new Command object, which contains all the information for each call to GoC function.
Get the circuit breaker by name (create it if it doesn’t exist) by calling GetCircuit(name) function.
Declare condition variable ticketCond and ticketChecked with sync.Cond which is used to communicate between goroutines.
Declare function returnTicket. What is a ticket? What does it mean by returnTicket? Let’s discuss it in detail later.
Declare another function reportAllEvent. This function is critical to error rate strategy, and we can leave it for detailed review in the following articles.
Declare an instance of sync.Once, which is another interesting synchronization primitives provided by golang.
Launch two goroutines, each of which contains many logics too. Simply speaking, the first one contains the logic of sending requests to the target service and the strategy of max concurrent request number, and the second one contains the timeout strategy.
Return a channel type value
Let’s review each of them one by one.
command
command struct goes as follows, which embeds sync.Mutex and defines several fields:
Note that command object iteself doesn’t contain command name information, and its lifecycle is just inside the scope of one GoC call. It means that the statistic metrics about the service request like error rate and concurrent request number are not stored inside command object. Instead, such metrics are stored inside circuit field which is CircuitBreaker type.
CircuitBreaker
As we mentioned in the workflow of GoC function, GetCircuit(name) is called to get or create the circuit breaker. It is implemented inside circuit.go file as follows:
type CircuitBreaker struct { Name string open bool forceOpen bool mutex *sync.RWMutex openedOrLastTestedTime int64
executorPool *executorPool // used in the strategy of max concurrent request number metrics *metricExchange // used in the strategy of request error rate }
funcnewCircuitBreaker(name string) *CircuitBreaker { c := &CircuitBreaker{} c.Name = name c.metrics = newMetricExchange(name) c.executorPool = newExecutorPool(name) c.mutex = &sync.RWMutex{}
return c }
All the fields of CircuitBreaker are important to understand how the breaker works.
There are two fields that are not simple type need more analysis, include executorPool and metrics.
executorPool: used for max concurrent request number strategy, which is just this article’s topic.
metrics: used for request error rate strategy, which will be discussed in the next article, all right?
executorPool
We can find executorPool logics inside the pool.go file:
type executorPool struct { Name string Metrics *poolMetrics Max int Tickets chan *struct{} // Tickets channel }
funcnewExecutorPool(name string) *executorPool { p := &executorPool{} p.Name = name p.Metrics = newPoolMetrics(name) p.Max = getSettings(name).MaxConcurrentRequests
p.Tickets = make(chan *struct{}, p.Max) // send Max numbers of value into the Tickets channel for i := 0; i < p.Max; i++ { p.Tickets <- &struct{}{} }
return p }
It makes use of golang channel to realize max concurrent request number strategy. Note that Tickets field, which is a buffered channel with capicity of MaxConcurrentRequests is created. And in the following for loop, make the buffered channel full by sending value into the channel until reaching the capacity.
As we have shown above, in the first goroutine of GoC function, the Tickets channel is used as follows:
Each call to GoC function will get a ticket from circuit.executorPool.Tickets channel until no ticket is left, which means the number of concurrent requests reaches the threshold. In that case, the default case will execute , and the service will be gracefully degraded with fallback logic.
On the other side, after each call to GoC is done, the ticket need to be sent back to the circuit.executorPool.Tickets, right? Do you remember the returnTicket function mentioned in above section. Yes, it is just used for this purpose. The returnTicket function defined in GoC function goes as follows:
1 2 3 4 5 6 7 8
returnTicket := func() { cmd.Lock() for !ticketChecked { ticketCond.Wait() } cmd.circuit.executorPool.Return(cmd.ticket) // return ticket to the executorPool cmd.Unlock() }
It calls executorPool.Return function:
1 2 3 4 5 6 7 8 9 10 11
// Return function in pool.go file func(p *executorPool) Return(ticket *struct{}) { if ticket == nil { return }
p.Metrics.Updates <- poolMetricsUpdate{ activeCount: p.ActiveCount(), } p.Tickets <- ticket // send ticket back to Tickets channel }
The design and implementation of Tickets is a great example of golang channel in the real-world application.
In summary, the max concurrent request number strategy can be illustrated as follows:
Summary
In this article, max concurrent requests strategy in hystrix is reviewed carefully, and I hope you can learn something interesting from it.
But I didn’t cover the detailed logics inside GoC function, including sync.Cond, sync.Once and fallback logics. Let’s review them and timeout strategy together in the next article.
In this series of articles, I want to talk about circuit breaker pattern based on an popular open source project hystrix (in fact, I will take a look at the golang version hystrix-go, instead of the original version which is written in Java).
As the first article of this series, I will give a general introduction to circuit breaker, let you know what it is and why it is important. Moreover, let’s review the background about the project hystrix-go and hystrix, and understand the basic usage with a small demo example.
Circuit breaker
Software in distributed architectures generally have many dependencies, and the failure at some point for each dependency(even the most reliable service) is inevitable.
What happens if our failing service becomes unresponsive? All services that rely on it have risks to become unresponsive, too. This is called catastrophic cascading failure.
The basic idea behind the circuit breaker is very simple. A circuit breaker works by wrapping calls to a target service and keeps monitoring the failure rates. Once the failures reach a certain threshold, the circuit breaker will trip ,and all the further calls to the circuit return with a fault or error.
The design philosophy behind the circuit breaker pattern is fail fast: when a service becomes unresponsive, other services relying on it should stop waiting for it and start dealing with the fact that the failing service may be unavailable. By preventing a single service’s failure cascading through the entire system, the circuit breaker pattern contributes to the stability and resilience of the whole system.
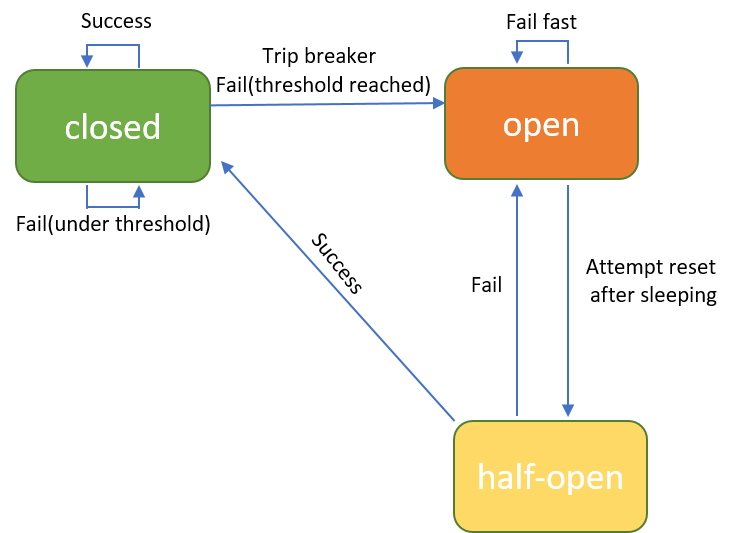
The circuit breaker pattern can be implemented as a finite-state machine shown below:
There are three statuses: open, closed and half-open
closed: Requests are passed to the target service. Keep monitoring the metrics like error rate, request numbers and timeout. When these metrics exceed a specific threshold(which is set by the developer), the breaker is tripped and transitions into open status.
open: Requests are not passed to the target service, instead the fallback logic(which is defined by developer as well) will be called to handle the failure. The breaker will stay open status for a period of time called sleeping window, after which the breaker can transition from open to half-open.
half-open: In this status, a limited number of requests are passed to the target service, which is aims at resetting the status. If the target service can response successfully then the break is reset back to closed status. Or else the breaker transitions back to open status.
That’s basic background about circuit breaker, you can find much more information about it on line.
Next, let’s investigate the project hystrix.
hystrix
hystrix is a very popular open source project. You can find everything about it in this link.
I want to quote several important points from the above link. Hystrix is designed to do the following:
Give protection from and control over latency and failure from dependencies accessed (typically over the network) via third-party client libraries.
Stop cascading failures in a complex distributed system.
Fail fast and rapidly recover.
Fallback and gracefully degrade when possible.
Enable near real-time monitoring, alerting, and operational control.
You can see hystrix perfectly implements the idea of circuit breaker pattern we talked about in the last section, right?
The hystrix project is developed with Java. In this sereis of articles I prefer to use a golang version hystrix-go, which is a simplified version but implements all the main designs and ideas about circuit breaker.
For the usage of hystrix-go, you can find it in this link, which is very straightforward to understand. And you can easily find many other articles online with demo examples to show more usage level stuff. Please go head to read.
In my articles, I want to go into the source code of hystrix-go and have an advanced investigation about how circuit breaker is implemented. Please follow up to read the next articles in this series.
Summary
In this article, I talked about the background of circuit breaker pattern and the basic information of the popular open-source project in this field hystrix-go. Next step, we will take an in-depth look at the source code of this project.