In the following series of posts, I will take an in-depth look at the synchronization primitives provided by Golang.
Although the recommended synchronization mechanism in Golang is channel, there are several powerful synchronization primitives provided in Golang sync package. Based on the official document, Other than the Once and WaitGroup types, most are intended for use by low-level library routines. If you read the code of low-level open source projects or the standard packages, you will see synchronization primitives in sync package frequently.
As the first post in this series, let’s check the source code of sync.Once, which is also the simplest one.
sync.Once
If you have several logics running in various go-routines, and you want only one of the logics will execute finally. For this kind of scenario, sync.Once is a perfect option for you.
Let’s review the source code of sync.Once defined inside the once.go file:
Struct Once has a status flag done whose value is 0 when initialized. Wrap the logic you want to execute in a function f, and pass this function f to the Do() method. When Do is called for the first time, the logic in f executes after that done flag is set to 1, other calls to Do don’t execute f.
One misleading point is If once.Do(f) is called multiple times, only the first call will invoke f, even if f has a different value in each invocation. Check the following example:
funcmain() { go TaskOne() go TaskTwo() time.Sleep(time.Second) }
funcPrintTask(id int) { fmt.Printf("Task %d, Run once\n", id) }
funcTaskOne() { doOnce.Do(func() { PrintTask(1) }) fmt.Println("Run this every time") }
funcTaskTwo() { doOnce.Do(func() { PrintTask(2) }) fmt.Println("Run this every time") }
Even Do is called twice with different f logic, but only the first call is invoked since they are bound to the same instance of Once.
fast path and slow path
As you saw above, the implementation of sync.Once is not complex. But one question comes to my mind when I double check the code. Why do we need split the logics into two functions Do and doSlow? Why the second function name is doSlow, and what does slow mean here?
Do you have similar questions?
I found the answer in the comments of once.go file.
1
2
3
4
if atomic.LoadUint32(&o.done) == 0 {
	// Outlined slow-path to allow inlining of the fast-path.
	o.doSlow(f)
}
Note that it mentioned two words: fast path and slow path.
Fast path is a term used in computer science to describe a path with shorter instruction path length through a program compared to the ‘normal’ path. For a fast path to be effective it must handle the most commonly occurring tasks more efficiently than the ‘normal’ path, leaving the latter to handle uncommon cases, corner cases, error handling, and other anomalies. Fast paths are a form of optimization.
In the Once case, since the first call to Do function will set done to 1, so the most common case or status for Once is the done flag equals to 1. The fast path in Do function is just for this common case. While the done flag equals to initial status 0 can be regarded as uncommon case, which is specially handled in the doSlow function. The performance can be optimized in this way.
hot path
Another very interesting concept worth mentioning is hot path, and it occurs in the Once struct design.
1
2
3
4
5
6
7
8
9
type Once struct {
	// done indicates whether the action has been performed.
	// It is first in the struct because it is used in the hot path.
	// The hot path is inlined at every call site.
	// Placing done first allows more compact instructions on some architectures (amd64/x86),
	// and fewer instructions (to calculate offset) on other architectures.
	done uint32
	m    Mutex
}
At first glance, it’s just plain and ordinary struct, but the comments emphasize that doneis first in the struct because it is used in the hot path. It means that done is defined as the first field in Once struct on purpose. And the purpose is also described in the comment Placing done first allows more compact instructions on some architectures (amd64/x86), and fewer instructions (to calculate offset) on other architectures.
What does that mean? I found a great answer in this post. The conclusion is:
A hot path is a sequence of instructions executed very frequently.
When accessing the first field of a structure, we can directly dereference the pointer to the structure to access the first field. To access other fields, we need to provide an offset from the first value in addition to the struct pointer.
In machine code, this offset is an additional value to pass with the instruction which makes it longer. The performance impact is that the CPU must perform an addition of the offset to the struct pointer to get the address of the value to access.
Thus machine code to access the first field of a struct is more compact and faster.
Simply speaking, accessing the first field of a struct is faster since the CPU doesn’t need to compute the memory offset!
This is really a good lesson to show the high-level code you programmed can have such a big difference in the bottom level.
In the last post, I shared the first part about the context package: valueCtx and cancelCtx. Let us continue the journey to discover more in this post.
functask(ctx context.Context) { i := 1 for { select { case <-ctx.Done(): fmt.Println(ctx.Err()) return default: fmt.Println(i) time.Sleep(time.Second * 1) i++ } } }
Since we already know the behavior of cancelCtx, it’s quite straightforward to understand how WithTimeout works. It accepts a timeout duration after which the done channel will be closed and context will be canceled. And a cancel function will be returned as well, which can be called in case the context needs to be canceled before timeout.
WithDeadline usage is quite similar to WithTimeout, you can find related example easily. Let us review the source code:
1
2
3
4
5
6
7
8
9
type timerCtx struct { cancelCtx timer *time.Timer deadline time.Time }
Since WithTimeout and WithDeadline have many common points between them, so they share the same type of context: timerCtx, which embeds cancelCtx and defines two more properties: timer and deadline.
Let us review what happens when we create a timerCtx:
funcWithDeadline(parent Context, d time.Time) (Context, CancelFunc) { if parent == nil { panic("cannot create context from nil parent") } // Get deadline time of parent context. if cur, ok := parent.Deadline(); ok && cur.Before(d) { // The current deadline is already sooner than the new one. return WithCancel(parent) } c := &timerCtx{ cancelCtx: newCancelCtx(parent), deadline: d, } propagateCancel(parent, c) dur := time.Until(d) if dur <= 0 { c.cancel(true, DeadlineExceeded) // deadline has already passed return c, func() { c.cancel(false, Canceled) } } c.mu.Lock() defer c.mu.Unlock() if c.err == nil { // 'err' field of the embedded cancelCtx is promoted c.timer = time.AfterFunc(dur, func() { c.cancel(true, DeadlineExceeded) }) } return c, func() { c.cancel(true, Canceled) } }
Compared to WithCancle and WithValue, WithDeadline is more complex, let us go through bit by bit.
Firstly, parent.Deadline will get the deadline time for parent context. The Deadline method signature was defined in the Context interface as below:
1
2
3
4
type Context interface {
	Deadline() (deadline time.Time, ok bool)
	...
}
In the context package, only emptyCtx and timerCtx type implement this method:
1
2
3
4
5
6
7
func(*emptyCtx) Deadline() (deadline time.Time, ok bool) { return }
So when we call parent.Deadline(), if the parent context is also type of timerCtx which implements its own Deadline() method, then you can get the deadline time of the parent context. Otherwise if the parent context is type of cancelCtx or valueCtx, then finally the Deadline() method of emptyCtx will be called and you will get the zero value of type time.Time and bool (if you have interest, you can verify by yourself the zero value: 0001-01-01 00:00:00 +0000 UTC and false).
If parent’s deadline is earlier than the passed in deadline parameter, then directly return a cancelCtx by calling WithCancel(parent). Of course when the passed in deadline is reasonable, we need to create a timerCtx:
1
2
3
4
5
6
7
8
//inside WithDeadline() function
...
c := &timerCtx{
	cancelCtx: newCancelCtx(parent),
	deadline:  d,
}
propagateCancel(parent, c)
...
In the above code, you see propagateCancel method again, I have discussed about it in the last post, if you don’t understand it, please refer here.
Similar to cancelCtx, timerCtx sends the context cancel signal by closing the done channel by calling its own cancel method. There two scenarios when cancelling the context:
timeout cancel: when the deadline exceeded, automatically close the done channel;
manual cancel: call the returned cancel function to close the done channel before the deadline;
1 2 3 4 5
// inside WithDeadline function ... // return the cancel function as the second return value return c, func() { c.cancel(true, Canceled) } ...
Both scenarios call cancel method:
1 2 3 4 5 6 7 8 9 10 11 12 13 14 15
func(c *timerCtx) cancel(removeFromParent bool, err error) { c.cancelCtx.cancel(false, err) // close the done channel and set err field if removeFromParent { // Remove this timerCtx from its parent cancelCtx's children. // Note: timerCtx c's parent is c.cancelCtx.Context removeChild(c.cancelCtx.Context, c) } c.mu.Lock() // stop and clean the timer if c.timer != nil { c.timer.Stop() c.timer = nil } c.mu.Unlock() }
timerCtx implements cancel method to stop and reset the timer then delegate to cancelCtx.cancel.
Summary
In the second part of this post series, we discussed how timeout and deadline context are implemented in the source code level. In this part, Golang struct embedding technique is used a lot, you can compare it with traditional OOP solution to have a deep understanding.
As a Golang user and learner, I always think Golang standard package is a great learning resource, which can provide best practices for both the language itself and various software or programming concepts.
In this post, I will share what I learned about package context.
context is widely used in the Golang ecosystem, and I bet you must often come across it. Many standard packages rely on it.
There are many good articles online explaining the background and usage examples of context, I will not spend too much time on that, just add a brief introduction here.
The problems context plans to solve are:
Let’s say that you started a function and you need to pass some common parameters to the downstream functions. You cannot pass these common parameters each as an argument to all the downstream functions.
You started a goroutine which in turn start more goroutines and so on. Suppose the task that you were doing is no longer needed. Then how to inform all child goroutines to gracefully exit so that resources can be freed up
A task should be finished within a specified timeout of say 2 seconds. If not it should gracefully exit or return.
A task should be finished within a deadline eg it should end before 5 pm . If not finished then it should gracefully exit and return
You can refer to this slide from the author of context package to understand more about the background.
In this post, I will show you the details of context package source code. You can find all the related source code inside the context.go file. You will notice that context package content is not long, and there are roughly 500 lines of code. Moreover, there are many comments, so the actual code is only half. These 200+ lines of code are a great piece of learning resource in my eyes.
Source code analysis
Context interface and emptyCtx
The most basic data structure of context is the Context interface as below:
1 2 3 4 5 6
type Context interface { Deadline() (deadline time.Time, ok bool) Done() <-chanstruct{} Err() error Value(key interface{}) interface{} }
Context is just an interface, which is very hard to imagine how to use it. So let us continue reviewing some types implement such interface.
When context is used, generally speaking, the first step is creating the root context with context.Background() function(the contexts are chained together one by one and form a tree structure, and the root context is the first one in the chain). Let’s check what it is:
1 2 3 4 5
var background = new(emptyCtx)
funcBackground() Context { return background }
Background function return the background which is a global variable declared as new(emptyCtx). So what is emptyCtx, let continue:
// An emptyCtx is never canceled, has no values, and has no deadline. It is not // struct{}, since vars of this type must have distinct addresses. type emptyCtx int
func(*emptyCtx) Deadline() (deadline time.Time, ok bool) { return }
func(e *emptyCtx) String() string { switch e { case background: return"context.Background" case todo: return"context.TODO" } return"unknown empty Context" }
You can see that emptyCtx is declared as a new customized type based on int. In fact, it’s not important that emptyCtx is based on int, string or whatever. The important thing is all the four methods defined in interface Context return nil. So the root context is never canceled, has no values, and has no deadline.
Let’s continue to review other data types.
valueCtx and WithValue
As mentioned above, one typical usage of context is passing data. In this case, you need to create a valueCtx with WithValue function. For example, the following example:
WithValue is a function has only one return value:
1 2 3 4 5 6 7 8 9 10 11 12
funcWithValue(parent Context, key, val interface{}) Context { if parent == nil { panic("cannot create context from nil parent") } if key == nil { panic("nil key") } if !reflectlite.TypeOf(key).Comparable() { panic("key is not comparable") } return &valueCtx{parent, key, val} }
Please ignore the reflectlite part, I will give a in-depth discussion about it in another post. In this post, we only need to care the return value type is &valueCtx:
1 2 3 4
type valueCtx struct { Context key, val interface{} }
There is one interesting Golang language feature here: embedding, which realizes composition. In this case, valueCtx has all the four methods defined in Context. In fact, embedding is worthy much more discussion. Simplying speaking, there are 3 types of embedding: struct in struct, interface in interface and interface in struct. valueCtx is the last type, you can refer to this great post
When you want to get the value out, you can use the Value method:
If the provided key parameter does not match the current context’s key, then the parent context’s Value method will be called. If we still can’t find the key, the parent context’s will call its parent as well. The search will pass along the chain until the root node which will return nil as we mentioned above:
functask(ctx context.Context) { i := 1 for { select { case <-ctx.Done(): fmt.Println(ctx.Err()) return default: fmt.Println(i) time.Sleep(time.Second * 1) i++ } } }
When main goroutine wants to cancel task goroutine, it can just call cancelFunc. Then the task goroutine will exit and stop running. In this way, goroutine management will be easy task. Let’s review the code:
cancelCtx is complex, let’s go through bit by bit.
WithCancel returns two values, the first one &c is type cancelCtx which is created with newCancelCtx, the second one func() { c.cancel(true, Canceled) } is type CancenlFunc(just a general function).
mu sync.Mutex // protects following fields done chanstruct{} // created lazily, closed by first cancel call children map[canceler]struct{} // set to nil by the first cancel call err error// set to non-nil by the first cancel call }
Context is embedded inside cancelCtx as well. Also it defines several other fields. Let’s see how it works by checking the receiver methods:
1 2 3 4 5 6 7 8 9
func(c *cancelCtx) Done() <-chanstruct{} { c.mu.Lock() if c.done == nil { c.done = make(chanstruct{}) } d := c.done c.mu.Unlock() return d }
Done method returns channel done. In the above demo, task goroutine listen for cancel signal from this done channel like this:
1 2 3 4 5
select { case <-ctx.Done(): fmt.Println(ctx.Err()) return ...
The signal is trigger by calling the cancle function, so let’s review what happens inside it and how the signals are sent to the channel. All the logic is inside cancel method of cancelCtx:
func(c *cancelCtx) cancel(removeFromParent bool, err error) { if err == nil { panic("context: internal error: missing cancel error") } c.mu.Lock() if c.err != nil { c.mu.Unlock() return// already canceled } // set the err property when cancel is called for the first time c.err = err if c.done == nil { c.done = closedchan } else { close(c.done) } for child := range c.children { // NOTE: acquiring the child's lock while holding parent's lock. child.cancel(false, err) } c.children = nil c.mu.Unlock()
if removeFromParent { removeChild(c.Context, c) } }
As shown above, cancelCtx has four properties, we can understand their purpose clearly in this cancel:
mu: a general lock to make sure goroutine safe and avoid race condition;
err: a flag representing whether the cancelCtx is cancelled or not. When the cancelCtx is created, err value is nil. When cancel is called for the first time, it will be set by c.err = err;
done: a channel which sends cancel signal. To realize this, context just close the done channel instead of send data into it. This is an interesting point which is different from my initial imagination before I review the source code. Yes, after a channel is closed, the receiver can still get zero value from the closed channel based on the channel type. Context just make use of this feature.
children: a Map containing all its child contexts. When current context is cancelled, the cancel action will be propogated to the children by calling child.cancel(false, err) in the for loop. Then next question is when the parent-child relationship is established? The secret is inside the propagateCancel() function;
funcpropagateCancel(parent Context, child canceler) { done := parent.Done() if done == nil { return// parent is never canceled }
select { case <-done: // parent is already canceled child.cancel(false, parent.Err()) return default: }
if p, ok := parentCancelCtx(parent); ok { p.mu.Lock() if p.err != nil { // parent has already been canceled child.cancel(false, p.err) } else { if p.children == nil { p.children = make(map[canceler]struct{}) } p.children[child] = struct{}{} } p.mu.Unlock() } else { atomic.AddInt32(&goroutines, +1) gofunc() { select { case <-parent.Done(): child.cancel(false, parent.Err()) case <-child.Done(): } }() } }
propagateCancel contains many logics, and some of them can’t be understood easily, I will write another post for those parts. But in this post, we only need to understand how to establish the relationship between parent and child for genernal cases.
The key point is function parentCancelCtx, which is used to find the innermost cancellable ancestor context:
1 2 3 4 5 6 7 8 9 10 11 12 13 14 15 16 17 18
funcparentCancelCtx(parent Context) (*cancelCtx, bool) { done := parent.Done() if done == closedchan || done == nil { returnnil, false } // Value() will propagate to the root context p, ok := parent.Value(&cancelCtxKey).(*cancelCtx) if !ok { returnnil, false } p.mu.Lock() ok = p.done == done p.mu.Unlock() if !ok { returnnil, false } return p, true }
You can notice that Value method is called, since we analyzed in the above section, Value will pass the search until the root context. Great.
Back to the propagateCancel function, if cancellable ancestor context is found, then current context is added into the children hash map as below:
In this post, I will show you the usage and implementation of two Golang standard packages’ : bytes (especially bytes.Buffer) and bufio.
These two packages are widely used in the Golang ecosystem especially works related to networking, files and other IO tasks.
Demo application
One good way to learn new programming knowledge is checking how to use it in real-world applications. The following great demo application is from the open source book Network Programming with Go by Jan Newmarch.
For your convenience, I paste the code here. This demo consists of two parts: client side and server side, which together form a simple directory browsing protocol. The client would be at the user end, talking to a server somewhere else. The client sends commands to the server side that allows you to list files in a directory and print the directory on the server.
var buf [512]byte result := bytes.NewBuffer(nil) for { // read till we hit a blank line n, _ := conn.Read(buf[0:]) result.Write(buf[0:n]) length := result.Len() contents := result.Bytes() ifstring(contents[length-4:]) == "\r\n\r\n" { fmt.Println(string(contents[0 : length-4])) return } } }
funccdRequest(conn net.Conn, dir string) { conn.Write([]byte(CD + " " + dir)) var response [512]byte n, _ := conn.Read(response[0:]) s := string(response[0:n]) if s != "OK" { fmt.Println("Failed to change dir") } }
funcpwdRequest(conn net.Conn) { conn.Write([]byte(PWD)) var response [512]byte n, _ := conn.Read(response[0:]) s := string(response[0:n]) fmt.Println("Current dir \"" + s + "\"") }
Based on the above demo, let’s review how Bytes.Buffer is used.
According to Go official document:
Package bytes implements functions for the manipulation of byte slices. A Buffer is a variable-sized buffer of bytes with Read and Write methods.
The bytes package itself is easy to understand, which provides functionalities to manipulate byte slice. The concern is bytes.Buffer, what benefits can we get by using it? Let’s review the demo code where it is used.
var buf [512]byte result := bytes.NewBuffer(nil) for { // read till we hit a blank line n, _ := conn.Read(buf[0:]) result.Write(buf[0:n]) length := result.Len() contents := result.Bytes() ifstring(contents[length-4:]) == "\r\n\r\n" { fmt.Println(string(contents[0 : length-4])) return } } }
The above code block is from client.go part. And the scenario is: the client send DIR command to server side, server run this DIR command which will return contents of current directory. Client and server use conn.Read and conn.Write to communicate with each other. The client keeps reading data in a for loop until all the data is consumed which is marked by two continuous \r\n strings.
In this case, a new bytes.Buffer object is created by calling NewBuffer method and three other member methods are called: Write, Len and Bytes. Let’s review their source code:
The implementation is easy to understand and no need to add more explanation. One interesting point is inside the Write function. It will first check whether the buffer has enough room for new bytes, if no then it will call internal grow method to add more space.
In fact, this is the biggest benefit you can get from Buffer. You don’t need to manage the dynamic change of buffer length manually, bytes.Buffer will help you to do that. In this way you won’t waste memory by setting the possible maximum length just for providing enough space. To some extend, it is similar to the vector in C++ language.
Bufio
Next, let’s review how Bufio pacakge works. In our demo, it is used as following:
1
2
3
4
5
6
reader := bufio.NewReader(os.Stdin)
for { line, err := reader.ReadString('\n') // hide other code below }
Before we dive into the details about the demo code, let’s first understand what is the purpose of bufio package.
First we need to understand that when applications run IO operations like read or write data from or to files, network and database. It will trigger system call in the bottom level, which is heavy in the performance point of view.
Buffer IO is a technique used to temporarily accumulate the results for an IO operation before transmitting it forward. This technique can increase the speed of a program by reducing the number of system calls. For example, in case you want to read data from disk byte by byte. Instead of directly reading each byte from the disk every time, with buffer IO technique, we can read a block of data into buffer once, then consumers can read data from the buffer in whatever way you want. Performance will be improved by reducing heavy system calls.
Concretely, let’s review how bufio package do this. The Go official document goes like this:
Package bufio implements buffered I/O. It wraps an io.Reader or io.Writer object, creating another object (Reader or Writer) that also implements the interface but provides buffering and some help for textual I/O.
Let’s understand the definition by reading the source code:
1 2 3 4 5 6 7 8 9 10 11 12 13 14 15 16 17
// NewReader and NewReaderSize in bufio.go funcNewReader(rd io.Reader) *Reader { return NewReaderSize(rd, defaultBufSize) }
funcNewReaderSize(rd io.Reader, size int) *Reader { b, ok := rd.(*Reader) if ok && len(b.buf) >= size { return b } if size < minReadBufferSize { size = minReadBufferSize } r := new(Reader) r.reset(make([]byte, size), rd) return r }
In our demo, we use NewReader which then calls NewReaderSize to create a new Reader instance. One thing need to notice is that the parameter is io.Reader type, which is an important interface implements only one method Read.
1 2 3 4
// the Reader interface in io.go file type Reader interface { Read(p []byte) (n int, err error) }
In our case, we use os.Stdin as the function argument, which will read data from standard input.
Then let’s reivew declaration of bufio.Reader which wraps io.Reader:
1 2 3 4 5 6 7 8 9
// Reader implements buffering for an io.Reader object. type Reader struct { buf []byte rd io.Reader // reader provided by the client r, w int// buf read and write positions err error lastByte int// last byte read for UnreadByte; -1 means invalid lastRuneSize int// size of last rune read for UnreadRune; -1 means invalid }
bufio.Reader has many methods defined, in our case we use ReadString, which will call another low-level method ReadSlice.
func(b *Reader) ReadSlice(delim byte) (line []byte, err error) { s := 0 for { // Search buffer. if i := bytes.IndexByte(b.buf[b.r+s:b.w], delim); i >= 0 { i += s line = b.buf[b.r : b.r+i+1] b.r += i + 1 break }
if b.err != nil { line = b.buf[b.r:b.w] b.r = b.w err = b.readErr() break }
if b.Buffered() >= len(b.buf) { b.r = b.w line = b.buf err = ErrBufferFull break }
s = b.w - b.r
b.fill() // buffer is not full }
if i := len(line) - 1; i >= 0 { b.lastByte = int(line[i]) b.lastRuneSize = -1 }
return }
When buf byte slice contains data, it will search the target value inside it. But initially buf is empty, it need firstly load some data, right? That is the most interesting part. The b.fill() is just for that.
if b.w >= len(b.buf) { panic("bufio: tried to fill full buffer") }
// Read new data: try a limited number of times. for i := maxConsecutiveEmptyReads; i > 0; i-- { n, err := b.rd.Read(b.buf[b.w:]) // call the underlying Reader if n < 0 { panic(errNegativeRead) } b.w += n if err != nil { b.err = err return } if n > 0 { return } } b.err = io.ErrNoProgress }
The data is loaded into buf by calling the underlying Reader,
1
n, err := b.rd.Read(b.buf[b.w:])
in our case is os.Stdin.
Customized Reader
To have a better understand about the buffering IO technique, we can define our own customized Reader and pass it bufio.NewReader as follows:
funcmain() { r := new(Reader) br := bufio.NewReader(r) for { token, err := br.ReadSlice(',') fmt.Printf("Token: %q\n", token) if err == io.EOF { fmt.Println("Read done") break } } }
Please run the demo code above, observe the output and think about why it generates such result.
Summary
In this post, I only talked about Reader part of bufio, if you understand the behavior explained above clearly, it’s easy to understand Writer quickly as well.
In this post, I’ll talk about Golang package based on my learning and use experience.
You’ll learn the following topics in this post:
Basics about Go package
How to use and import a Go package
Demo with real-world Go package
Basics about Go package
What’s Go package
Simply speaking, Go package provides a solution to the requirement of code reuse, which is an important part of software engineering.
In Golang’s official document, the definition of packages goes as following:
Go programs are organized into packages. A package is a collection of source files in the same directory that are compiled together. Functions, types, variables, and constants defined in one source file are visible to all other source files within the same package.
There are several critical points in the definition let’s review them one by one.
First, one package can contain more than one source files. This is different from other languages, for example in Javascript , each source file is an independent module that exports variables to other files to import.
Second, all the source files for a package are organized inside a directory. The package name must be the same as the directory name.
Third, the files inside the subdirectories should be excluded. Each subdirectory is another package.
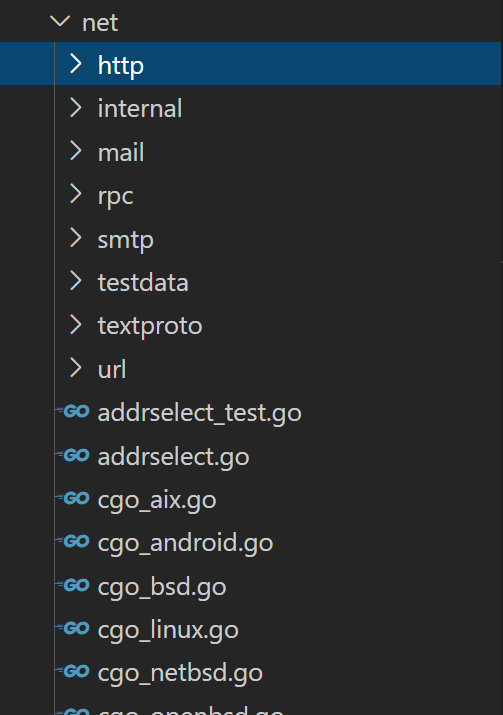
To have a better understanding about these three points, let’s check the structure of the net package in the Go standard library.
All the .go source files directly under the net directory contain the following pacakge declaration on the top of the file:
1
package net
This means that it is part of the net package.
There are several subdirectories under net directoy, and each of these subdirectory is an independant package. For example, the net/http package consists of all the files inside the http subdirectory. If you open the files inside http directory, the package declaration is:
1
package http
Types of Go package
Generally speaking, there are two types of packages: library package and main package. After build, the main package will be compiled into an executable file. While a library package is not self-executable, instead, it provides the utility functions.
Member visibility of Go package
Different from other language like Javascript, Golang package doesn’t provide keyword such as export, public, private and so on to explicitly export members to the outside world.
Instead, the visibility of member inside one package is determined by the casing of the first letter. If the first letter is upper case then it can be impoted by other packages.
Lifecycle of package
For the library package we mentioned above, when it’s imported the init method will be called automatically. You can do some package initialization work inside it.
For the main pacakge, it must provide the main method as the entry point when it’s running.
Use and Import Go package
Before Go Module was introduced, the development of Golang application is based on the Go workspace. In this post, I’ll focus on the solutions based on Go workspace. Go module is another topic I will talk about in a future post.
Go workspace
By convention, all your Go code and the code(or the packages) you import, must reside in a single workspace. A workspace is nothing but a directory in your file system whose path is stored in the environment variable GOPATH.
As a new comer into the Golang world, at the beginning the GOPATH workspace configuration confused me a lot.
For example, you want to use third-party library Consol in your application. After you run
1
go get github.com/hashicorp/consul
The library is installed on your local machine. The code would be cloned on disk at $GOPATH/src/github.com/hashicorp/consul
In your application, you will import this library in the following way:
1 2 3
import ( "github.com/hashicorp/consul" )
Thanks to the GOPATH mechanics, this import can be resolved on disk and Go tool can locate, build and test the code. Simply speaking, the package name maps to the real location of the package on your local machine.
But of course, this mechanics has many limitation such as package version control, workspace constrains an so on. That’s the motivation why we need Go module.
Ways to import Golang package
Beside the default way, there are several ways to import a package based on your usage.
Import as alias: this is useful when two packages have the same name. You can give any alias for an imported package as below:
Import for side effect: when reading source code of popular open source projects, you can see many package import in the following way:
1
2
3
4
5
6
import ( "database/sql"
_ "github.com/lib/pq" )
It’s widely used when all you need from the imported package is running the init method.
For example in the above case, library pq is imported in this way. You can check the source code for pq library and its init method call sql.Register method for registration as below:
Internal package: this is an interesting feature to learn. Internal is a special directory name recognized by the Go tool which will prevent the package from being imported by any other packages unless both share the same ancestor directory. The packages in an internal directory are said to be internal packages. In detail you can refer to this artical.
In this two-part blog series, I want to share the lessons learned from reading the soruce code of the project Fabio. In my previous blog, I shared with you how to use Fabio as a load balancing in the micro services applicatoins, in detail you can refer to this article.
Since Fabio is not a tiny project, it’s hard to cover everything inside this project. I will mainly focus on two aspects: firstly in the architecture design level, I will study how it can work as a load balancer without any configuration file (Part one), and secondly in the language level, I want to summarize the best practice of writing Golang programs by investigating which features of Golang it uses and how it uses (Part two).
Fabio architecture design
Let’s start by introducing some background about Fabio. Following paragraph is from its official document:
Fabio is an HTTP and TCP reverse proxy that configures itself with data from Consul. Traditional load balancers and reverse proxies need to be configured with a config file.
If you’re familiar with other load balancer service such as Nginx, it will be easy for you to understand how Fabio is different and why it seems interestring.
For example, if you’re using Nginx as your load balancer, you need to maintain a config file where the routing rules need to be defined as below
1 2 3 4 5 6 7 8 9
server { location / { root /data/www; }
location /images/ { root /data; } }
But Fabio is a zero-conf load balancer. Cool, right? Let’s review the design and code to uncover the secrets under the hood.
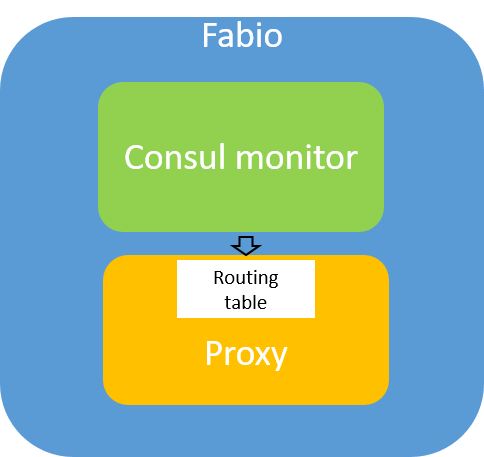
Simply speaking, Fabio’s design can be divided into two parts: Consul monitor and proxy. Consul monitor forms and updates a route table by watching the data stored in Consul, and proxy distributes the request to target service instance based on the route table.
log.Printf("[INFO] Setting log level to %s", logOutput.Level()) if !logOutput.SetLevel(cfg.Log.Level) { log.Printf("[INFO] Cannot set log level to %s", cfg.Log.Level) }
log.Printf("[INFO] Runtime config\n" + toJSON(cfg)) log.Printf("[INFO] Version %s starting", version) log.Printf("[INFO] Go runtime is %s", runtime.Version())
if time.Now().After(deadline) { exit.Fatal("[FATAL] Timeout registering backend.") }
time.Sleep(cfg.Registry.Retry) if atomic.LoadInt32(&shuttingDown) > 0 { exit.Exit(1) } } }
This function is not hard to understand. Fabio supports various modes: file, static, consul and custom, and will select one mode to use based on the detailed condition inside the cfg parameter. In our case, we only need to focus on the consul mode.
Next let’s review watchBackend() function to check how it keeps watching consul’s data.
Firstly in line 24, we need to understand registry.Default.WatchServices(). Since initBackend function already decided we’re using Consul mode, so we need to check the WatchServices() function inside the Consul package as following:
1 2 3 4 5 6 7 8 9 10 11
package consul
func(b *be) WatchServices() chanstring { log.Printf("[INFO] consul: Using dynamic routes") log.Printf("[INFO] consul: Using tag prefix %q", b.cfg.TagPrefix)
m := NewServiceMonitor(b.c, b.cfg, b.dc) svc := make(chanstring) go m.Watch(svc) return svc }
The return value is svc which is just a string typed channel. And svc channel is passed into goroutine go m.watch() as an argument. This is a very typical usage in Golang programming where two goroutines need to communicate with each other via the channel. Let’s go on and check the Watch function:
func(w *ServiceMonitor) Watch(updates chanstring) { var lastIndex uint64 var q *api.QueryOptions for { if w.config.PollInterval != 0 { q = &api.QueryOptions{RequireConsistent: true} time.Sleep(w.config.PollInterval) } else { q = &api.QueryOptions{RequireConsistent: true, WaitIndex: lastIndex} } checks, meta, err := w.client.Health().State("any", q) if err != nil { log.Printf("[WARN] consul: Error fetching health state. %v", err) time.Sleep(time.Second) continue } log.Printf("[DEBUG] consul: Health changed to #%d", meta.LastIndex) // determine which services have passing health checks passing := passingServices(checks, w.config.ServiceStatus, w.strict) // build the config for the passing services updates <- w.makeConfig(passing) // remember the last state and wait for the next change lastIndex = meta.LastIndex } }
You can see updates <- w.makeConfig(passing) in Line 21, it just sends a message into the channel.
Another interestring point is w.client.Health().State("any", q) in line 11. This is one API provided in the consul/api package. If you check the implementation of it, you’ll find out in fact it just sends a HTTP get request to this endpoint /v1/health/state/ of Consul service which will return all the health check status for the services registered in Consul.
And the above logic runs inside a for loop, in this way Fabio keeps sending request to query the latest status from Consul. If new services are discovered, then the status will be updated dynamically as well, no need to restart Fabio.
So far you should understand how Fabio can work as a load balancer with any hardcoded routing config.
Let’s go back to the watchBackend function to continue the analysis.
After debugging, I find the message passed via the svc channel follows the following format:
// Table contains a set of routes grouped by host. // The host routes are sorted from most to least specific // by sorting the routes in reverse order by path. type Table map[string]Routes
// Routes stores a list of routes usually for a single host. type Routes []*Route
// Route maps a path prefix to one or more target URLs. // routes can have a weight value which describes the // amount of traffic this route should get. You can specify // that a route should get a fixed percentage of the traffic // independent of how many instances are running. type Route struct { // Host contains the host of the route. // not used for routing but for config generation // Table has a map with the host as key // for faster lookup and smaller search space. Host string
// Path is the path prefix from a request uri Path string
// Targets contains the list of URLs Targets []*Target
// wTargets contains targets distributed according to their weight wTargets []*Target
// total contains the total number of requests for this route. // Used by the RRPicker total uint64
That’s all for the consul monitor part. Simply speaking, Fabio keeps looping the latest service status from Consul and process the status information into a routing table.
Proxy
The second part is about network proxy, which is easier to understand than the first part.
Fabio supports various network protocols, but in this post let’s focus on HTTP/HTTPS case. In side the main.go file, you can find the following function:
return &proxy.HTTPProxy{ Config: cfg.Proxy, Transport: newTransport(nil), InsecureTransport: newTransport(&tls.Config{InsecureSkipVerify: true}), Lookup: func(r *http.Request) *route.Target { t := route.GetTable().Lookup(r, r.Header.Get("trace"), pick, match, globCache, cfg.GlobMatchingDisabled) if t == nil { notFound.Inc(1) log.Print("[WARN] No route for ", r.Host, r.URL) } return t }, Requests: metrics.DefaultRegistry.GetTimer("requests"), Noroute: metrics.DefaultRegistry.GetCounter("notfound"), Logger: l, TracerCfg: cfg.Tracing, AuthSchemes: authSchemes, } }
The return value’s type is http.Handler, which is an interface defined inside Go standard library as following:
1 2 3
type Handler interface { ServeHTTP(ResponseWriter, *Request) }
And the actual return value’s type is proxy.HTTPProxy which is a struct implementing the ServeHTTP method. You can find the code inside the proxy package in Fabio repo.
1 2 3 4 5 6 7
type HTTPProxy struct { ... }
func(p *HTTPProxy) ServeHTTP(w http.ResponseWriter, r *http.Request) { ... }
Another point needs to be mentioned is Lookup field of HTTPProxy struct:
1 2 3 4 5 6 7 8
Lookup: func(r *http.Request) *route.Target {
	t := route.GetTable().Lookup(r, r.Header.Get("trace"), pick, match, globCache, cfg.GlobMatchingDisabled)
	if t == nil {
		notFound.Inc(1)
		log.Print("[WARN] No route for ", r.Host, r.URL)
	}
	return t
}
You don’t need to understand the details, just pay attention to route.GetTable() which is the routing table mentioned above. Consul monitor maintains the table and proxy consumes the table. That’s it.
In this article which is part one of this blog series , you learned how Fabio can serve as a load balancer without any config files by reviewing the design and reading the source code.
In part two, let’s review how Golang was used and try to summarize the best practise of wrting Golang programs.
In the last post, I show you how to do service discovery in a Golang Cloud-Native microservice application based on Consul and Docker with a real demo. In that demo, the simple helloworld-server service is registered in Consul and the helloworld-client can discover the dynamic address of the service via Consul. But the previous demo has one limitation, as I mentioned in the last post, in the real world microservice application, each service may have multiple instances to handle the network requests.
In this post, I will expand the demo to show you how to do load balancing when multiple instances of one service are registered in Consul.
Continue with the last post, the new demo will keep using Cloud-Native way with Docker and Docker-compose.
Fabio for load balancing
To do load balancing for Consul, there are several strategies are recommended from the Consul official document. In this post I choose to use Fabio.
Fabio is an open source tool that provides fast, modern, zero-conf load balancing HTTP(S) and TCP router for services managed by Consul. Users register services in Consul with a health check and fabio will automatically route traffic to them. No additional configuration required.
Fabio is an interesting project, it realizes loading balancing based on the tag information of service registration in Consul.
Users register a service with a tag beginning with urlprefix-, like:
1
urlprefix-/my-service
Then when a request is made to fabio at /my-service, fabio will automatically route traffic to a healthy service in the cluster. I will show you how to do it in the following demo. And I will also do simple research on how Fabio realizes this load balancing strategy by reviewing the source code and share the findings in the next post.
Fabio load balancing demo
Firstly, all the code and config files shown in this post can be found in this github repo, please git checkout the load-balancing branch for this post’s demo.
Server side
For the helloworld-server, there are two changes:
First, each service instance should have an unique ID;
Second, add Tags for service registration and the tag should follow the rule of Fabio.
port, _ := strconv.Atoi(getPort()[1:len(getPort())]) address := getHostname() /* Each service instance should have an unique serviceID */ serviceID := fmt.Sprintf("helloworld-server-%s:%v", address, port) /* Tag should follow the rule of Fabio: urlprefix- */ tags := []string{"urlprefix-/helloworld"}
funchelloworld(w http.ResponseWriter, r *http.Request) { log.Println("helloworld service is called.") w.WriteHeader(http.StatusOK) fmt.Fprintf(w, "Hello world.") }
funccheck(w http.ResponseWriter, r *http.Request) { w.WriteHeader(http.StatusOK) fmt.Fprintf(w, "Consul check") }
funcgetPort() (port string) { port = os.Getenv("PORT") iflen(port) == 0 { port = "8080" } port = ":" + port return }
The changes are at Line 30, 32 and 40 and comments are added there to explain the purpose of the change. Simply speaking, now each service instance registers itself with a unique ID, which is consisted of the basic service name (helloworld-server in this case) and the dynamic address. Also, we add urlprefix-/helloworldTags for each registration. urlprefix- is the default config of Fabio, you can set customized prefix if needed. Based on this Tags, Fabio can do automatic load balancing for the /helloworld endpoint.
That’s all for the code change for server side. Let’s review the changes for the client.
/* For load balancing, run fabioLoadBalancing(); For simple service discovery, run serviceDiscoveryWithConsul(); */ funcmain() { fabioLoadBalancing() fmt.Println("Starting Client.") var client = &http.Client{ Timeout: time.Second * 30, } callServerEvery(10*time.Second, client) }
service := services["helloworld-server"] address := service.Address port := service.Port url = fmt.Sprintf("http://%s:%v/helloworld", address, port) }
funchello(t time.Time, client *http.Client) { response, err := client.Get(url) if err != nil { fmt.Println(err) return } body, _ := ioutil.ReadAll(response.Body) fmt.Printf("%s. Time is %v\n", body, t) }
funccallServerEvery(d time.Duration, client *http.Client) { for x := range time.Tick(d) { hello(x, client) } }
client.go
Previously, we need to run serviceDiscoveryWithConsul to discover the service address to call. Now since we have Fabio working as the load balancer, so we send the request to Fabio and our request will be distributed to the service instance by Fabio.
This part of logic is implemented inside the following method:
To get the address of the Fabio service, we need to config it as an environment variable, which will be set in the yml file of Docker-compose. Let’s review the new yml file now.
helloworld-client: build: context:. dockerfile:client/Dockerfile image:helloworld-client:1.0.2# upgrade to v1.0.2 environment: -CONSUL_HTTP_ADDR=consul:8500 -FABIO_HTTP_ADDR=fabio:9999# environment variable for fabio service address depends_on: -consul -helloworld-server networks: -my-net
fabio:# add a new service: Fabio as load balancer image:fabiolb/fabio:latest environment: -registry_consul_addr=consul:8500# environment variable for consul service address -proxy_strategy=rr# environment variable for load balancing strategy. rr is round-robin ports: -"9998:9998" -"9999:9999" depends_on: -consul networks: -my-net
networks: my-net: driver:bridge
docker-compose.yml
There several changes in this yml config file:
Add a new service Fabio. As mentioned above Fabio is a zero-conf load balancing, which can simply run as a docker container. This is so convenient and totally matches Cloud-Native style. The two environment variables: registry_consul_addr and proxy_strategy, are set to define the Consul’s address and the round-robin strategy.
Set the FABIO_HTTP_ADDR environment variable for the client. This is what we mentioned in the last section, which allows client.go to get Fabio service address and send requests.
Upgrade two docker images to v1.0.2.
Demo
It’s time to run the demo! Suppose you have all the docker images build on your local machine, then run the following command:
1
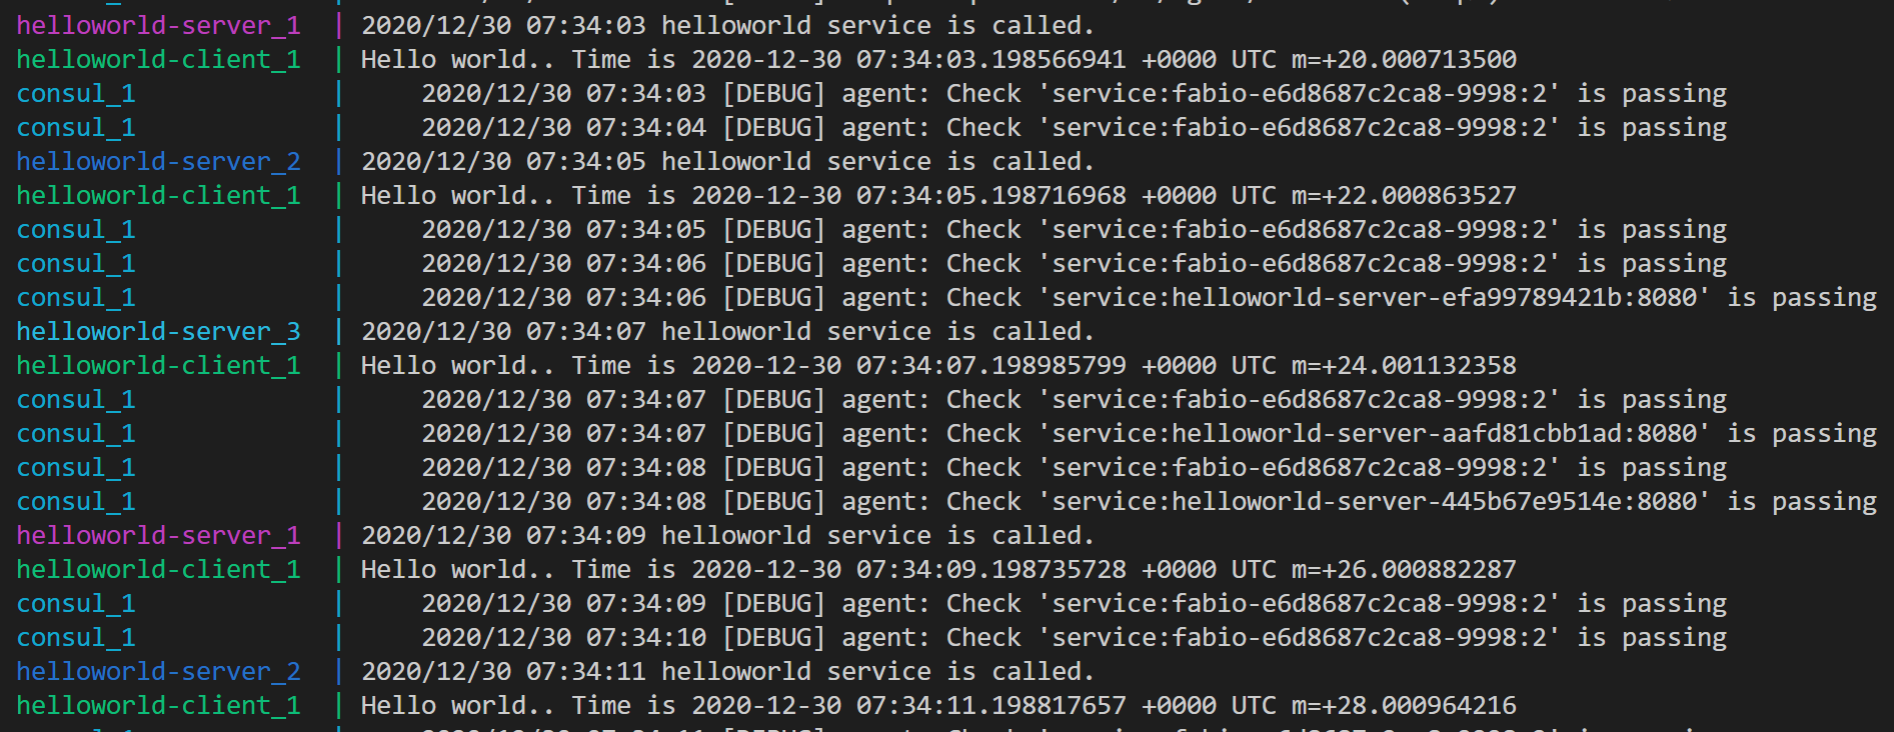
docker-compose up --scale helloworld-server=3
This command has an important tip about Docker-compose: how to run multiple instances of certain service. In our case, we need multiple instances of helloworld-server for load balancing. Docker-compose supports this functionality with --scale option. For the above command, 3 instances of helloworld-server will be launched.
You can see the demo’s result in the following image:
The client repeatedly and periodically sends the request and each request is distributed by Fabio to one of the three instances in round-robin style. Just what we expect!