How HTTPS works: part five - manual verification of SSL/TLS certificates

Background

In the previous articles of this series, we examined how digital signatures and certificates make the TLS handshake process work. Generally speaking, this process is handled by platforms like web browsers. In this article, I want to demystify the process of TLS handshake by manual verification of SSL/TLS certificates step by step.

Certificate chain

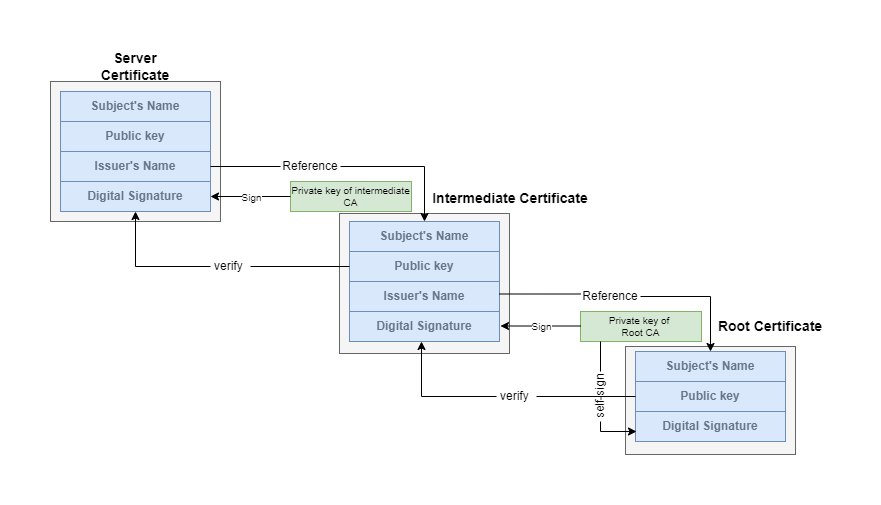
In this previous article, we mentioned that the server returns not one, but multiple certificates. These associated certificates form a certificate chain as follows:

The intermediate CA signs the server certificate, and Root CA signs the certificate of the intermediate CA (There can be multiple intermediate CAs). Pay attention to the subject and issuer names of each certificate, and you can notice that one certificate’s issue name is another certificate’s subject name. Certificates can find their CA’s certificate in the chain with this information.

For example, the following openssl command prints the certificate chain of google.com:

1
openssl s_client -showcerts -connect google.com:443

The previous article explained that the chain contains three certificates. Let us extract the google.com server certificate into file google_com.pem and the intermediate CA certificate into file intermediate_ca.pem. These two files are the input data for this manual verification experiment.

Manual verification of SSL/TLS certificates

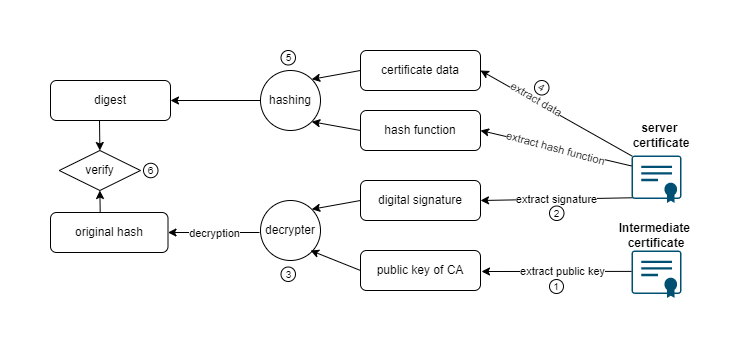
The entire process can be illustrated as follows:

Let us go through it step by step.

Extract the public key of intermediate CA

Since the certificate of the google.com server is signed with intermediate CA’s private key. The first step is to extract the public key of intermediate CA from its certificate.

1
openssl x509 -in ./intermediate_ca.pem -noout -pubkey > ./intermediate_ca_pub.pem

The content of file intermediate_ca_pub.pem goes as follows:

1
2
3
4
5
6
7
8
9
-----BEGIN PUBLIC KEY-----
MIIBIjANBgkqhkiG9w0BAQEFAAOCAQ8AMIIBCgKCAQEA9Yjf52KMHjf4N0KQf2yH
0PtlgiX96MtrpP9t6Voj4pn2HOmSA5kTfAkKivpC1l5WJKp6M4Qf0elpu7l07FdM
ZmiTdzdVU/45EE23NLtfJXc3OxeU6jzlndW8w7RD6y6nR++wRBFj2LRBhd1BMEiT
G7+39uBFAiHglkIXz9krZVY0ByYEDaj9fcou7+pIfDdNPwCfg9/vdYQueVdc/Fdu
Gpb//Iyappm+Jdl/liwG9xEqAoCA62MYPFBJh+WKyl8ZK1mWgQCg+1HbyncLC8mW
T+9wScdcbSD9mbS04soud/0t3Au2axMMjBkrF5aYufCL9qAnu7bjjVGPva7Hm7GJ
nQIDAQAB
-----END PUBLIC KEY-----

You can look at the public key in PEM format (which is not readable to humans).

Extract the signature

Next, let us extract the digital signature of the google.com server’s certificate. This task is a little bit complex, and we need several Linux commands to form a data stream pipeline as follows:

1
2
3
4
openssl x509 -in ./google_com.pem -text -noout -certopt ca_default,no_validity,no_serial,no_subject,no_extensions,no_signame \
| grep -v 'Signature Algorithm' \
| tr -d '[:space:]:' \
| xxd -r -p > ./certificate-signature.bin
  • openssl x509: extract the digital signature. openssl command supports certopt option, which allows multiple arguments separated by commas. The output of the first command should be:
1
2
3
4
5
Signature Algorithm: sha256WithRSAEncryption
76:6a:8a:d8:44:ac:14:40:92:36:f3:4a:b5:cb:54:36:67:c7:
<... content omitted ...>
14:22:3f:2a:90:a5:e4:9b:26:df:33:15:4b:d2:5c:f7:89:8e:
f7:6a:c4:a6
  • grep -v: invert the sense of matching and select non-matching lines (because of -v option).Signature Algorithm: sha256WithRSAEncryption is matched, but only the Hex code lines are selected based on the invert-match rule. The data stream after filtering should be:
1
2
3
4
76:6a:8a:d8:44:ac:14:40:92:36:f3:4a:b5:cb:54:36:67:c7:
<... content omitted ...>
14:22:3f:2a:90:a5:e4:9b:26:df:33:15:4b:d2:5c:f7:89:8e:
f7:6a:c4:a6

Note Signature Algorithm: sha256WithRSAEncryption means that the signature is signed with SHA-256 hash function and RSA encryption algorithm. When we need to re-compute the hash again, we must use the same hash function: SHA-256.

  • tr -d: delete the colons. The colons are to make it more readable. After removing the formatting colons, the output only contains Hex code.

  • xxd -r -p: convert the Hex code into binary format and redirect to file certificate-signature.bin

Decrypt the signature

Now that we have both the digital signature and the public key of the intermediate CA. We can decrypt the signature as follows:

1
openssl rsautl -verify -inkey ./intermediate_ca_pub.pem -in ./certificate-signature.bin -pubin > ./certificate-signature-decrypted.bin

Store the decrypted signature in file certificate-signature-decrypted.bin. We can view the hash with openssl like so:

1
openssl asn1parse -inform der -in ./certificate-signature-decrypted.bin

The output is:

1
2
3
4
5
0:d=0  hl=2 l=  49 cons: SEQUENCE
2:d=1 hl=2 l= 13 cons: SEQUENCE
4:d=2 hl=2 l= 9 prim: OBJECT :sha256
15:d=2 hl=2 l= 0 prim: NULL
17:d=1 hl=2 l= 32 prim: OCTET STRING [HEX DUMP]:66EFBE4CEA76272C76CEE8FA297C1BF70C41F8E049C7E0E4D23C965CBE8F1B84

The hash is in the last line: 66EFBE4CEA76272C76CEE8FA297C1BF70C41F8E049C7E0E4D23C965CBE8F1B84.

Re-compute the hash

Now that we got the original hash of the certificate, we need to verify whether we can re-compute the same hash using the same hashing function (as mentioned above SHA-256 in this case).

The previous article explained that the digital signature is signed based on all of the information instead of only public key. We need to extract everything but the signature from the certificate.

We can extract the data and output it to file google_com_cert_body.bin as follows:

1
openssl asn1parse -i -in ./google_com.pem -strparse 4 -out ./google_com_cert_body.bin  -noout

Note: you can refer to this openssl document to have a deeper understanding about the behavior of this command.

Finally, let us re-compute the hash with SHA256 as follows:

1
2
3
openssl dgst -sha256 ./google_com_cert_body.bin

SHA256(./google_com_cert_body.bin)= 66efbe4cea76272c76cee8fa297c1bf70c41f8e049c7e0e4d23c965cbe8f1b84

The re-computed hash is 66efbe4cea76272c76cee8fa297c1bf70c41f8e049c7e0e4d23c965cbe8f1b84, which matches with the original hash. So we can get the conclusion that: the intermediate CA signs the goole.com server certificate.

Summary

In this article, we go through the verification process of SSL/TLS certificates step by step manually. I have to admit that the concepts of digital signatures and certificates are too abstract to understand, especially in the details. I hope the experiment, which carries out with certificates from the real world, can help you do that.

Reference

x509 Certificate Manual Signature Verification written by George Bolo.

How HTTPS works: part four - digital signature

Background

The second article of this series shows that we should not directly exchange public key to establish a secure channel. Instead, certificates should be used to establish trust between clients and servers. And the last article examines the content of certificates, which encodes two very crucial pieces of information: the server’s public key and a digital signature that can confirm the certificate’s authenticity. In this article, let us examine what digital signature is and how it works.

Digital Signature

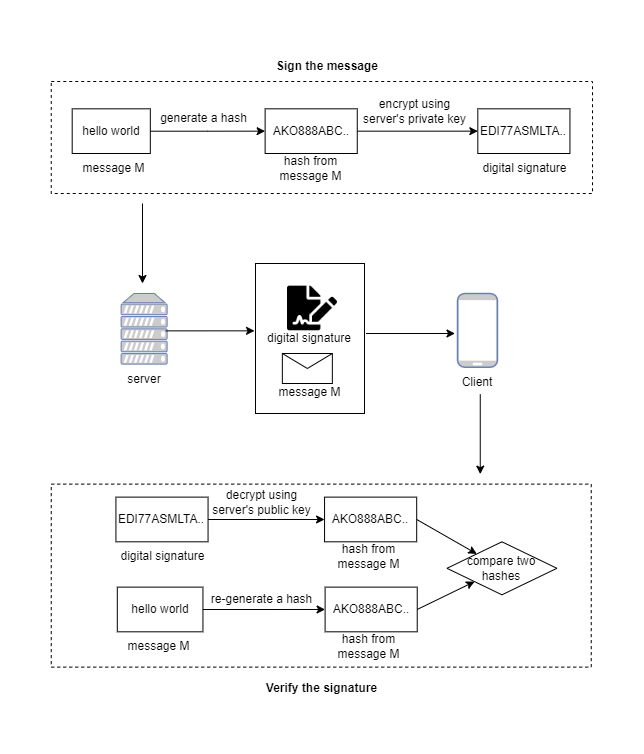
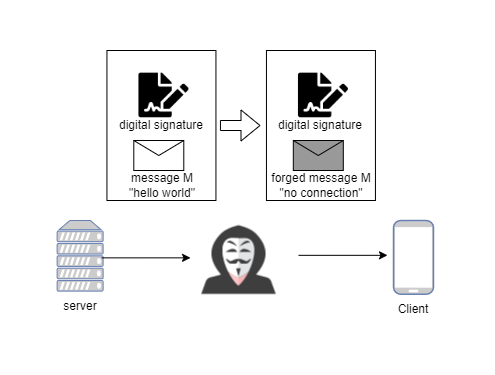
The concept of digital signature can be illustrated as follows:

When the server sends a message to the client, how can we prevent the attackers from eavesdropping on the message? The solution is that the server attaches its signature to the message, and the client accepts the message only if the verification of the certificate passes. So this process can be divided into two parts: sign the message to get the digital signature and verify the digital signature.

  • Sign the message: means hash the message and encrypt the hash with the server’s private key. The encrypted hash is called digital signature.

  • Verify the signature: means decrypt the signature with the server’s public key to get the hash, re-compute the hash of the message again, and compare the identity of two hashes.

What can we benefit from signing and verifying the digital signature? To verify the digital signature is to confirm two things:

  • Message Integrity: the message has not changed since the signature was attached because it is based on a cryptographic hash of the message.

  • Proof of Origin: the signature belongs to the person who alone has access to the private key. In this way, the recipient of the message can be sure of the origin of the message.

Information security has other attributes, but integrity and authentication are the two traits you must know.

Secrets behind digital signature

As mentioned in the above section, the digital signature can prove the integrity of the message and the authenticity of the message’s owner. To understand how it works, you must understand the following two facts:

  • Hash is irreversible

In the previous articles, we explained that cryptography is a two-way algorithm. You can encrypt the plaintext to the ciphertext and decrypt the ciphertext back to the plaintext. It means the cryptographic algorithm is reversible.

Different from cryptographic algorithms, A hash is irreversible!. This irreversibility is the whole point.

The goal of any cryptographic hashing algorithm is to reduce the arbitrarily sized input into a fixed-sized hash. The cryptographic hashing algorithm should guarantee that no two different messages can produce an identical hash. That is collide.

In this way, it is impossible for attackers to reverse engineer such a collision.

The attacker intercepts the message and changes it. Then the verification process of the signature on the client-side can not pass since the re-computed hashing can not match the original hashing.

I will write about how to implement a hash function in the future. In this article, you can ignore the details. Just remember that hashing is irreversible.

The private key prove identity

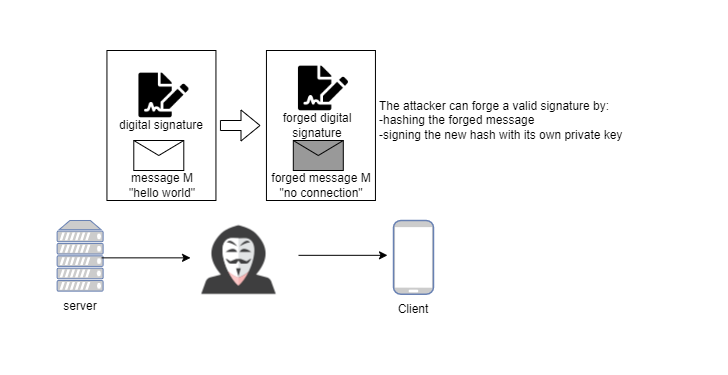
The attack shown above does not pass the verification because the signature and the forged message do not match. Then this time, the attacker compute a new hash based on the forged message and sign the hash with his private key. Can this attack work?

The short answer is No.

When the client gets the digital signature, the first step is to decrypt it. The decryption breaks for this new attack because the forged signature is signed with the attacker’s private key instead of the server’s private key.

It’s impossible for anybody except the owner of the private key to generate something that can be decrypted using the public key. This is the nature of public-key cryptography. I will write other articles to explain it mathematically in the future.

In a word, the private key can prove identity.

How does signature make certificate secure?

The digital signature is not designed only for TLS certificates, and it has other applications, which is not the focus of my article. The important thing is to understand how to apply digital signature in the PKI framework and how it makes certificates more secure.

The key is that the certificate associates the public key with the server you are connecting to. As we see in last article, the certificate must contain some information about the identity of the server, such as the domain name of the server. For example, the Subject property of the certificate we examined in the last article

1
Subject: CN = *.google.com

And the digital signature is signed based on all of the information instead of only public key. It can prevent man-in-the-middle attack in the two following cases:

  • The attacker intercepts the server’s certificate and changes the public key or any other information, the hash code in the signature does not match the hash code of the content of the forged certificate, and the client rejects it. It is Message Integrity mentioned above.

  • The attacker can obtain a certificate signed by the trusted CA by pretending as a legitimate business. When the client requests a certificate from the server, the attacker can replace it with his own. The validation on the client-side can not pass. Although the attacker’s certificate is signed by a trusted CA, the domain name(or other server information) does not match the expected one. It is Proof of Origin mentioned above.

So far, I hope you can understand (roughly) the beauty of this Internet security framework.

Summary

In this article, I examined how a digital signature works. You see how to sign a signature and how to verify it. Digital signature and certificate are the most abstract part of the PKI framework. So in the following article, let me illustrate the whole process by manually going through the certificate verification process step by step. We will use openssl to examine the result in each step.

How HTTPS works: part three - the anatomy of certificate

Background

In the last article, we examined the importance of certificates, which prevent us from the man-in-the-middle attacks. But we did not explain the mechanics of certificates, and it will be the focus of the following articles. In this article, let us first examine how the TLS certificate looks like and what kind of information it contains?

Anatomy of certificate

The official name of SSL/TLS certificate is X.509 certificate. Before we can examine the content of the certificate, we must get it. We can do this with openssl. openssl is a popular tool in the network security field. In the following articles, we will use it a lot. For the use of openssl, you can refer to this online document.

Let us pull the certificate from google.com domain as follows:

1
openssl s_client -showcerts -connect google.com:443

The output contains a large amount of information, and I omit some unnecessary codes to make it compact as follows:

1
2
3
4
5
6
7
8
9
10
11
12
13
14
15
16
17
18
19
20
21
22
23
24
25
26
27
28
29
30
31
32
33
34
35
36
37
38
39
40
41
42
43
44
45
46
47
CONNECTED(00000003)
depth=2 C = US, O = Google Trust Services LLC, CN = GTS Root R1
verify return:1
depth=1 C = US, O = Google Trust Services LLC, CN = GTS CA 1C3
verify return:1
depth=0 CN = *.google.com
verify return:1
---
Certificate chain
0 s:CN = *.google.com
i:C = US, O = Google Trust Services LLC, CN = GTS CA 1C3
-----BEGIN CERTIFICATE-----
MIINsjCCDJqgAwIBAgIRAPq8ife/MxCUCgAAAAEl/TIwDQYJKoZIhvcNAQELBQAw
FYN5klRqI0hWa3wYe6tnXm/2PvPbAwqsnAq3q+Iek+3pGm6YTshJyA7P9L176psd
<... content omitted ...>
dm6slAYpHOryFcrvXzu1lHSylCAFNT/OYcH1GLTf0qJXuN7YnX9swoYu2oCDkIyA
Hss2DDp7f8qf0VgDNNxZB8drZ9ID85YA3qgeIbHHAB8UIj8qkKXkmybfMxVL0lz3
iY73asSm
-----END CERTIFICATE-----
1 s:C = US, O = Google Trust Services LLC, CN = GTS CA 1C3
i:C = US, O = Google Trust Services LLC, CN = GTS Root R1
-----BEGIN CERTIFICATE-----
MIIFljCCA36gAwIBAgINAgO8U1lrNMcY9QFQZjANBgkqhkiG9w0BAQsFADBHMQsw
CQYDVQQGEwJVUzEiMCAGA1UEChMZR29vZ2xlIFRydXN0IFNlcnZpY2VzIExMQzEU
<... content omitted ...>
AJ2xDx8hcFH1mt0G/FX0Kw4zd8NLQsLxdxP8c4CU6x+7Nz/OAipmsHMdMqUybDKw
juDEI/9bfU1lcKwrmz3O2+BtjjKAvpafkmO8l7tdufThcV4q5O8DIrGKZTqPwJNl
1IXNDw9bg1kWRxYtnCQ6yICmJhSFm/Y3m6xv+cXDBlHz4n/FsRC6UfTd
-----END CERTIFICATE-----
2 s:C = US, O = Google Trust Services LLC, CN = GTS Root R1
i:C = BE, O = GlobalSign nv-sa, OU = Root CA, CN = GlobalSign Root CA
-----BEGIN CERTIFICATE-----
MIIFYjCCBEqgAwIBAgIQd70NbNs2+RrqIQ/E8FjTDTANBgkqhkiG9w0BAQsFADBX
MQswCQYDVQQGEwJCRTEZMBcGA1UEChMQR2xvYmFsU2lnbiBudi1zYTEQMA4GA1UE
<... content omitted ...>
9U5pCZEt4Wi4wStz6dTZ/CLANx8LZh1J7QJVj2fhMtfTJr9w4z30Z209fOU0iOMy
+qduBmpvvYuR7hZL6Dupszfnw0Skfths18dG9ZKb59UhvmaSGZRVbNQpsg3BZlvi
d0lIKO2d1xozclOzgjXPYovJJIultzkMu34qQb9Sz/yilrbCgj8=
-----END CERTIFICATE-----
---
Server certificate
subject=CN = *.google.com

issuer=C = US, O = Google Trust Services LLC, CN = GTS CA 1C3

---
<... content omitted ...>

Note: if you want to take a look at the full content of the above output, please refer to this online gist file

Based on the format of the output, you can figure out that the content between -----BEGIN CERTIFICATE----- and -----END CERTIFICATE----- markers is a certificate.

Another remarkable point is that the server returns not one, but three certificates. These associated certificates form a certificate chain. I will examine it in future articles. In the current post, let us focus on the certificate itself.

As shown above, the default format of the certificate is PEM(Privacy Enhanced Mail). PEM is a Base64 encoded binary format. We can convert it to a human-readable format with openssl.

First, let us extract the google.com server certificate into a file named google_com.pem. Remember to include the BEGIN and END markers, but nothing more. You can refer to this file.

Then, run the following openssl command:

1
openssl x509 -in google_com.pem -noout -text

here is the output (with some content omitted):

1
2
3
4
5
6
7
8
9
10
11
12
13
14
15
16
17
18
19
20
21
22
23
24
25
26
27
28
29
30
31
32
33
34
35
36
37
38
39
40
41
42
43
44
45
46
47
48
49
50
51
52
53
54
55
56
57
58
59
60
61
62
63
64
65
66
67
68
69
70
71
72
73
74
75
76
77
Certificate:
Data:
Version: 3 (0x2)
Serial Number:
fa:bc:89:f7:bf:33:10:94:0a:00:00:00:01:25:fd:32
Signature Algorithm: sha256WithRSAEncryption
Issuer: C = US, O = Google Trust Services LLC, CN = GTS CA 1C3
Validity
Not Before: Nov 29 02:22:33 2021 GMT
Not After : Feb 21 02:22:32 2022 GMT
Subject: CN = *.google.com
Subject Public Key Info:
Public Key Algorithm: id-ecPublicKey
Public-Key: (256 bit)
pub:
04:a1:c2:d2:74:cc:32:68:86:68:18:0c:8f:5a:e1:
<... content omitted ...>
c8:1b:6b:85:5d
ASN1 OID: prime256v1
NIST CURVE: P-256
X509v3 extensions:
X509v3 Key Usage: critical
Digital Signature
X509v3 Extended Key Usage:
TLS Web Server Authentication
X509v3 Basic Constraints: critical
CA:FALSE
X509v3 Subject Key Identifier:
04:0E:70:9D:60:11:97:01:1B:0E:7E:72:B1:99:E5:28:F7:29:E0:72
X509v3 Authority Key Identifier:
keyid:8A:74:7F:AF:85:CD:EE:95:CD:3D:9C:D0:E2:46:14:F3:71:35:1D:27

Authority Information Access:
OCSP - URI:http://ocsp.pki.goog/gts1c3
CA Issuers - URI:http://pki.goog/repo/certs/gts1c3.der

X509v3 Subject Alternative Name:
DNS:*.google.com, DNS:*.appengine.google.com, DNS:*.bdn.dev, DNS:*.cloud.google.com, DNS:*.crowdsource.google.com, DNS:*.datacompute.google.com, DNS:*.google.ca, DNS:*.
<... content omitted ...>
youtubekids.com, DNS:yt.be, DNS:*.yt.be, DNS:android.clients.google.com, DNS:developer.android.google.cn, DNS:developers.android.google.cn, DNS:source.android.google.cn
X509v3 Certificate Policies:
Policy: 2.23.140.1.2.1
Policy: 1.3.6.1.4.1.11129.2.5.3

X509v3 CRL Distribution Points:

Full Name:
URI:http://crls.pki.goog/gts1c3/QqFxbi9M48c.crl

CT Precertificate SCTs:
Signed Certificate Timestamp:
Version : v1 (0x0)
Log ID : 29:79:BE:F0:9E:39:39:21:F0:56:73:9F:63:A5:77:E5:
BE:57:7D:9C:60:0A:F8:F9:4D:5D:26:5C:25:5D:C7:84
Timestamp : Nov 29 03:22:38.708 2021 GMT
Extensions: none
Signature : ecdsa-with-SHA256
30:46:02:21:00:B5:C7:D9:40:A7:62:19:B6:D8:62:D2:
<... content omitted ...>
F9:53:FA:C7:EF:2C:BA:9C
Signed Certificate Timestamp:
Version : v1 (0x0)
Log ID : 41:C8:CA:B1:DF:22:46:4A:10:C6:A1:3A:09:42:87:5E:
4E:31:8B:1B:03:EB:EB:4B:C7:68:F0:90:62:96:06:F6
Timestamp : Nov 29 03:22:38.872 2021 GMT
Extensions: none
Signature : ecdsa-with-SHA256
30:45:02:21:00:87:35:02:A8:F6:06:EF:BC:F4:C1:95:
<... content omitted ...>
7E:5B:8B:35:E6:D2:3C
Signature Algorithm: sha256WithRSAEncryption
76:6a:8a:d8:44:ac:14:40:92:36:f3:4a:b5:cb:54:36:67:c7:
3a:a5:e9:b5:31:6c:51:5f:f3:ed:6a:99:ac:a7:5b:9c:ae:c9:
<... content omitted ...>
59:07:c7:6b:67:d2:03:f3:96:00:de:a8:1e:21:b1:c7:00:1f:
14:22:3f:2a:90:a5:e4:9b:26:df:33:15:4b:d2:5c:f7:89:8e:
f7:6a:c4:a6

The certificate contains many elements. They are specified using a syntax
referred to as ASN.1(Abstract Syntax Notation). As you can see, the certificate consists of two parts: Data and Signature Algorithm. The Data part contains the identity information about this server certificate. And the second part is the digital signature of this certificate. I’ll highlight the following elements:

  • Issuer: identifies who issues this certificate, also known as CA(certificate authority).
  • Subject: identifies to whom the certificate is issued. In the case of the server certificate, the Subject should be the organization that owns the server. But in the certificate chain, the Issuer of the server certificate is the Subject of the intermediate certificate. I’ll examine this relationship in detail in the following article.
  • Subject Public Key Info: the server’s public key. As we mentioned above, we created the certificate just to send the public key to the client.
  • Signature Algorithm: refers to the element at the bottom of the certificate. The sha256WithRSAEncryption part denotes the hash function and encryption algorithm used to sign the certificate. In the above case, the server uses sha256 as the hash function and RSA as the encryption algorithm. And the following block contains the signed hash of X.509 certificate data, called digital signature. The digital signature is the key information in certificates to establish trust between clients and servers. I’ll explain how a digital certificate works in the next article.

Summary

This article examines the information contained inside certificates using the tool openssl. We highlight some critical elements, and in the following article let us take a deep look at digital signature.

How HTTPS works: part two - why we need public key and certificate

Background

In the first article of this series, I gave a high-level overview of TLS handshake. It covers many complex concepts like encryption/decryption hash function public key private key and digital certificate. These concepts are defined in the framework of Public Key Infrastructure (PKI).

Let’ continue exploring the PKI. This article focuses on understanding the certificates used to establish trust between clients and servers.

Symmetric plus Asymmetric

Last post examined the TLS handshake. What is remarkable in this process is both symmetric encryption and asymmetric encryption are used.

symmetric encryption and asymmetric encryption are the two broad categories of cryptographic algorithms.

Symmetric key encryption uses the same key on both sides of the communication channel to encrypt or decrypt data. In HTTPS case, the client and server agree upon new keys to use for symmetric encryption, called session key. The HTTP messages are encrypted by this symmetric session key.

It has the advantage of being very fast with low overhead. In this way, it can minimize the performance impact TLS will have on the network communications.

But the real challenge of symmetric encryption is how to keep the key private and secure! The client and server must exchange keys without letting an interested eavesdropper see them. This seems like a chicken and egg problem; you can’t establish keys over an insecure channel, and you can’t establish a secure channel without keys. Right?

This key management turns out to be the most difficult part of encryption operations and is where asymmetric or public-key cryptography enters.

Simply speaking, a secure channel is firstly established with asymmetric cryptography and then the symmetric session key is exchanged through this secure channel.

Note: Cryptography is a complex topic, which isn’t in the scope of this series of articles. You can find tons of documents on the internet about it for deeper understanding. You can regard it as a block box and ignore the details. This doesn’t influence your understanding of HTTPS in high level

Why do we need certificates

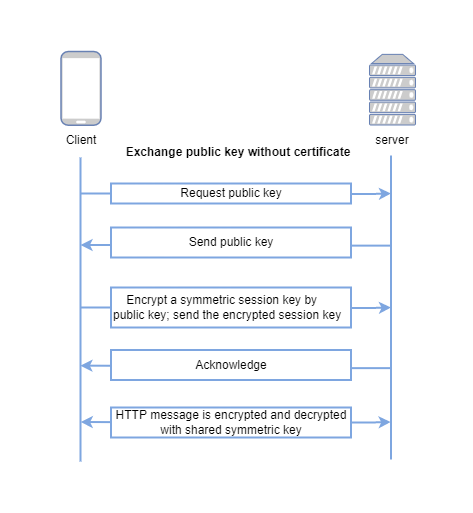
Now we know public-key cryptography is needed to establish a secure channel. Can we directly transmit the public key from servers to clients? Why do we need a certificate as the carrier to pass the public key? Can we exchange the public key without certificates as follows:

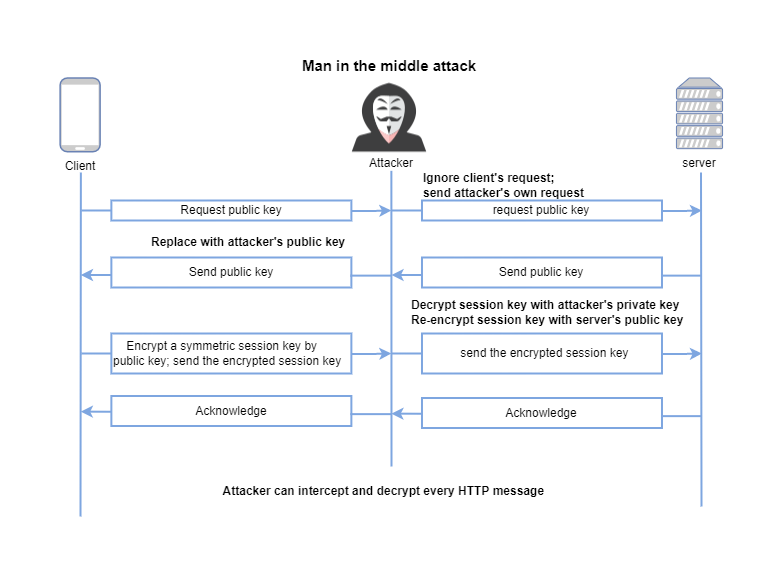
But the ultimate question is how you(as the client) know that the public key can be trusted as authentic? Assume that an attacker can not only view traffic, but also can intercept and modify it. Then the attacker can carry out man-in-the-middle attack as follows:

The attacker can replace the server’s public key with its own and send it to the client. The client doesn’t feel anything wrong and keeps using this public key as normal. The client encrypts the session key with the forged public key(the one from attackers) and sends it out. The attacker decrypts the session key with its private key, re-encrypt the session key with the server’s public key, and sends it to the server. As normal, the server decrypts the session key and agrees on it. But this session key is in the attacker’s hand too. The attacker can decrypt all the subsequent network traffic.

The problem here is that the client blindly trusts that the public key belongs to the server. That’s the reason why we need the certificates to establish trust between clients and servers.

Summary

In this article, we understand the importance of public-key cryptography and certificates. In the next article, we will take a deep look at the certificate.

How HTTPS works: part one - TLS handshake

Background

At present, everybody knows about the lock icon in the browser’s address bar indicating that the session is protected by HTTPS.In this series of articles, I’ll show you how HTTPS works based on my research.

Simply speaking, HTTPS = HTTP + SSL/TLS.

In the HTTP protocol, the client communicates with the server by transmitting the message over the network. But the message is in the original format known as plaintext. The bad guys (attackers) can easily eavesdrop on the message. That’s the reason why we need SSL/TLS.

There are tons of articles online describing the relationship between SSL and TLS. You can regard TLS as the modern and advanced version of SSL. By conversion, we generally put them together as the name of the network security protocol.

In the OSI model, the HTTP protocol is in layer 7, which is at the top of protocol stacks, how about TLS protocol. Although TLS is short for Transport Layer Security, it’s not in layer 4(transport layer). You can roughly regard it as layer 5(session layer).

This means there is no nontrivial difference between HTTP and HTTPS in terms of message transmission. This series of articles will focus on the security part of HTTPS. If you want to understand HTTP itself, please read my other articles.

As the first article of this series, I will talk about how to establish an HTTPS connection. This introduces a new concept: TLS handshake.

TLS Handshake

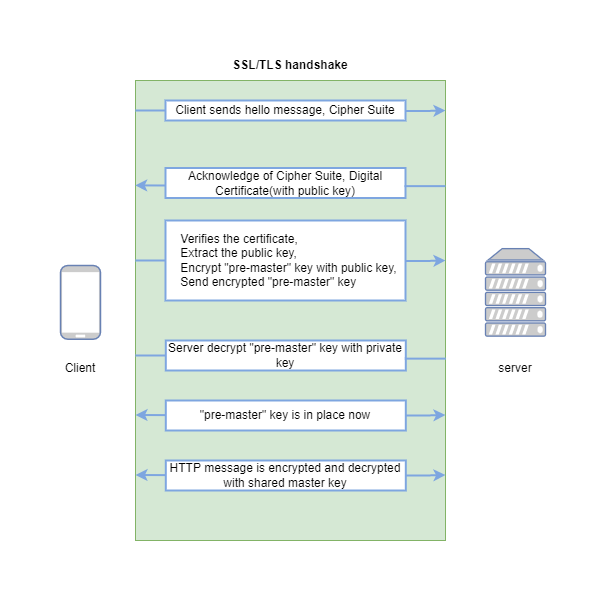
In my previous article, I wrote about TCP three way handshake to establish a TCP connection. For HTTP protocol, that’s all it needs to do. But HTTPS has to do TLS handshake as well. The process can be illustrated as follows:

Note TLS handshakes occur after a TCP connection has been opened via a TCP handshake.

Note to understand each detail of the above processing, you need to have some prerequisite knowledge such as encryption/decryption, hash function, public key, private key, and digital certificate. If you don’t know, don’t worry. After reading this series of articles, you’ll have it under your belt. In this article, I’ll go through this process roughly and ignore the detail of each step.

  • Client hello message: the client starts the handshake by sending a “hello” message to the server. This “hello” message includes the TLS version and the cipher suites supported on the client-side. cipher suites is a fancy name for the set of encryption algorithms for use in establishing a secure connection.

  • Server hello message: the server chooses the best(or suitable) SSL/TLS version and encryption algorithm among the candidates sent by the client. The server’s chosen cipher suite and certificate are sent to the client. certificate makes SSL/TLS encryption possible, which is critical to understand the entire process. For now, you need to know certificates contain the server’s public key which is sent to the client. And the private key is kept secret on the server.

  • Authentication: The client verifies the server’s certificate (I’ll investigate the certificate verification process at a very detailed level in another article).

  • Encrypt the pre-master key: The client generates one random “pre-master” key, encrypts “pre-master” key with the server’s public key (extract from the certificate) and sends the encrypted “pre-master” key to the server.

  • Decrypt the pre-master key: The server decrypts the “pre-master” key with its private key (The premaster key is encrypted with the public key and can only be decrypted with the private key by the server. This is called asymmetric encryption).

  • Session key created: Both client and server will generate a session key based on the “pre-master” key. The session key should be the same on both sides.

  • HTTP message encryption: Until the last step, the handshake is completed. The client and server will use the agreed session key to encrypt the following HTTP messages and continue the communication (since both sides use the same key, this is called symmetric encryption).

That’s all about TLS handshake process.

Summary

As the first article of this series, I go through the entire process of TLS handshake. In future articles, I’ll show you the mysteries of each part.

Why TCP connection termination needs four-way handshake

Background

In TCP/IP protocol stack, the three way handshake for connection establishment and four way handshake for connection termination are some concepts you must understand.

But after I learned TCP/IP stack, one question coming to my mind is why the connection termination needs four-way handshake. In this article, I will focus on this topic. To understand the answer to this question, we need to first explain the details of these two processes and compare them to find the difference.

TCP connection establishment

In contrast to UDP, TCP is a connection-oriented and reliable full duplex protocol, which requires a logical connection to be established between the two processes before data is exchanged. The connection must be maintained during the entire process that communication is taking place. And in TCP both sides can send data to its peer.

So four things need to happen for fully establishing a TCP connection:

  • Each node has send a SYN flag to its peer (that’s two things, one SYN in each direction)
  • Each node has received a ACK flag of its own SYN flag from its peer (that’s two things)

Both SYN and ACK are properties in TCP header, where SYN means synchronization and ACK means acknowledgement. In detail the process goes as follows:

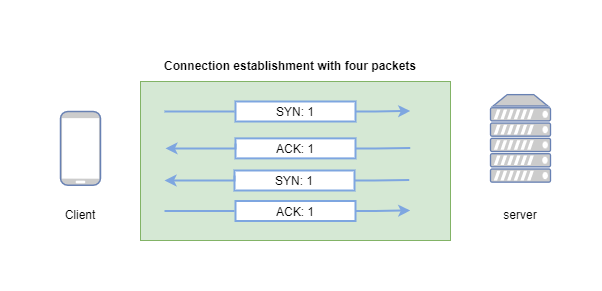
Firstly, the client sends the SYN: 1 packet to server to start the connection. When the server receives the packet, it will send the ACK: 1 packet to client to confirm that. Since in the TCP protocol, the server can also send data to the client. So the server needs to send the SYN: 1 packet to the client as well. Finally, when the client sends the ACK: 1 packet to the server. The establishment process is done, which goes as follows:

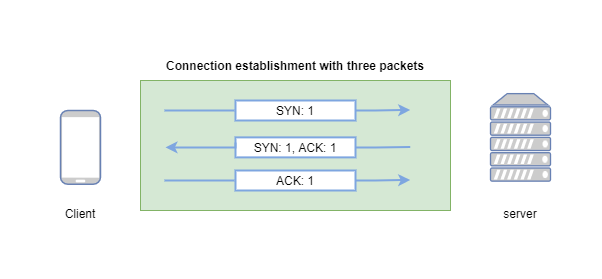
Note that the server sends two packets: ACK: 1 and SYN: 1 in sequence. Why not combine these two packets into one to have a better network performance? So the common implementation of TCP protocol goes as follows:

Note: besides SYN and ACK flag, in the establishment stage there are other fields need to be set in TCP header such as: sequence number and window. I will discuss these important TCP header fields in other articles.

TCP connection termination

When the data stream transportation (I will not cover this part in this article) is over, we need to terminate the TCP connection.

Same as above, four things need to happen for fully terminating a TCP connection:

  • Each node has send a FIN flag to its peer (that’s two things, one FIN in each direction)
  • Each node has received a ACK flag of its own FIN flag from its peer (that’s two things)

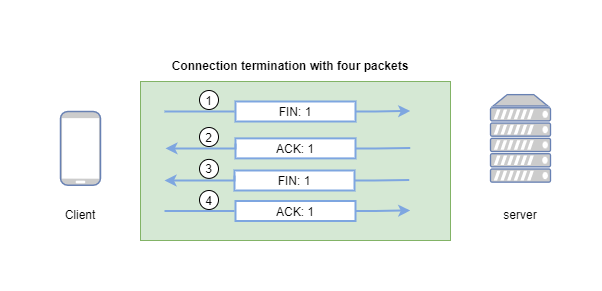
But the difference is that in most TCP implementation, four packets are used to terminate the connection. We didn’t combine the ACK: 1 packet (marked as ②) and the FIN: 1 packet (marked as ③) into one packet.

The reason is ACK: 1 packet (marked as ②) is send by TCP stack automatically. And the next FIN: 1 packet (marked as ③) is controlled in application level by calling close socket API. Application has the control to terminate the connection. So in common case, we didn’t merge this two packets into one.

It’s flexible for the application to control this process, for example, in this way the application can reuse existing TCP connection to reduce the overhead and improve the performance. In next article, I will talk about this topic.

How to build a Heap in linear time complexity

Background

In this article, I will focus on the topic of data structure and algorithms (in my eyes, one of the most important skills for software engineers). Someday I came across one question goes like this: how can building a heap be O(n) time complexity? This question confuses me for a while, so I did some investigation and research on it. This article will share what I learned during this process, which covers the following points:

  • What is a heap data structure? How does a heap behave?
  • How to implement a heap in C programming?
  • How to do the time complexity analysis on building the heap?

Basics of Heap

Before we dive into the implementation and time complexity analysis, let’s first understand the heap.

As a data structure, the heap was created for the heapsort sorting algorithm long ago. Besides heapsort, heaps are used in many famous algorithms such as Dijkstra’s algorithm for finding the shortest path. Essentially, heaps are the data structure you want to use when you want to be able to access the maximum or minimum element very quickly.

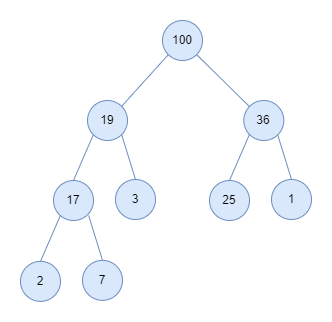
In computer science, a heap is a specialized tree-based data structure. A common implementation of a heap is the binary heap, in which the tree is a binary tree.

So a heap can be defined as a binary tree, but with two additional properties (that’s why we said it is a specialized tree):

  • shape property: a binary heap is a complete binary tree. So what is a complete binary tree? That is all levels of the tree, except possibly the last one(deepest) are fully filled, and, if the last level of the tree is not complete, the nodes of that level are filled from left to right. The complete binary tree is one type of binary tree, in detail, you can refer to this document to learn more about it.

  • Heap property: the key stored in each node is either greater than or equal to (max-heaps) or less than or equal to (min-heaps) the keys in the node’s children.

The following image shows a binary max-heap based on tree representation:

The heap is a powerful data structure; because you can insert an element and extract(remove) the smallest or largest element from a min-heap or max-heap with only O(log N) time. That’s why we said that if you want to access to the maximum or minimum element very quickly, you should turn to heaps. In the next section, I will examine how heaps work by implementing one in C programming.

Note: The heap is closely related to another data structure called the priority queue. The priority queue can be implemented in various ways, but the heap is one maximally efficient implementation and in fact, priority queues are often referred as “heaps”, regardless of how they may be implemented.

Implementation of Heap

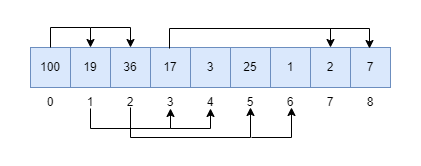
Because of the shape property of heaps, we usually implement it as an array, as follows:

  • Each element in the array represents a node of the heap.
  • The parent/child relationship can be defined by the elements’ indices in the array. Given a node at index i, the left child is at index 2*i + 1 and the right child is at index 2*i + 2, and its parent is at index ⌊(i-1)/2⌋ (⌊⌋ means Floor operation).

Based on the above model, let’s start implementing our heap. As we mentioned, there are two types of heaps: min-heap and max-heap, in this article, I will work on max-heap. The difference between max-heap and min-heap is trivial, you can try to write out the min-heap after you understand this article.

The completed code implementation is inside this Github repo.

First, let’s define the interfaces of max-heap in the header file as follows:

1
2
3
4
5
6
7
8
9
10
11
12
13
14
15
16
17
18
19
20
// maxheap.h file
#ifndef _MAXHEAP_H
#define _MAXHEAP_H

typedef int key_type;
typedef struct _maxheap *maxheap; // opaque type

maxheap maxheap_create();
maxheap maxheap_heapify(const key_type *array, int n);
void maxheap_destroy(maxheap);

int maxheap_findmax(maxheap);
void maxheap_insert(maxheap, key_type);
void maxheap_deletemax(maxheap);

int maxheap_is_empty(maxheap);
int maxheap_size(maxheap);
void maxheap_clear(maxheap);

#endif

We define the max-heap as struct _maxheap and hide its implementation in the header file. And expose this struct in the interfaces via a handler(which is a pointer) maxheap. This technique in C program is called opaque type. Opaque type simulates the encapsulation concept of OOP programming. So that the internal details of a type can change without the code that uses it having to change. The detailed implementation goes as following:

1
2
3
4
5
6
// maxheap.c file
struct _maxheap {
key_type* array;
int max_size;
int cur_size;
};

The max-heap elements are stored inside the array field. The capacity of the array is defined as field max_size and the current number of elements in the array is cur_size.

Next, let’s go through the interfaces one by one (most of the interfaces are straightforward, so I will not explain too much about them). The first one is maxheap_create, which constructs an instance of maxheap by allocating memory for it.

1
2
3
4
5
6
7
8
9
10
11
12
13
14
15
16
// maxheap.c file
maxheap maxheap_create() {
maxheap h = (maxheap)malloc(sizeof(struct _maxheap));
if (h == NULL) {
fprintf(stderr, "Not enough memory!\n");
abort();
}
h->max_size = 64;
h->cur_size = -1;
h->array = (key_type*) malloc(sizeof(key_type)*(h->max_size));
if (h->array == NULL) {
fprintf(stderr, "Not enough memory!\n");
abort();
}
return h;
}

The initial capacity of the max-heap is set to 64, we can dynamically enlarge the capacity when more elements need to be inserted into the heap:

1
2
3
4
5
6
7
8
9
10
11
12
13
14
15
16
// maxheap.c file
static void maxheap_double_capacity(maxheap h) {
int new_max_size = 2 * h->max_size;
key_type* new_array = (key_type*) malloc(sizeof(key_type)* (new_max_size));

if (new_array == NULL) {
fprintf(stderr, "Not enough memory!\n");
abort();
}
for(int i = 0; i < h->cur_size; i++) {
new_array[i] = h->array[i];
}
free(h->array);
h->array = new_array;
h->max_size = new_max_size;
}

This is an internal API, so we define it as a static function, which limits the access scope to its object file.

When the program doesn’t use the max-heap data anymore, we can destroy it as follows:

1
2
3
4
5
6
// maxheap.c file
void maxheap_destroy(maxheap h) {
assert(h);
free(h->array);
free(h);
}

Don’t forget to release the allocated memory by calling free.

Next, let’s work on the difficult but interesting part: insert an element in O(log N) time. The solution goes as follows:

  • Add the element to the end of the array. (The end of the array corresponds to the leftmost open space of the bottom level of the tree).
  • Compare the added element with its parent; if they are in the correct order(parent should be greater or equal to the child in max-heap, right?), stop.
  • If not, swap the element with its parent and return to the above step until reaches the top of the tree(the top of the tree corresponds to the first element in the array).

The first step of adding an element to the array’s end conforms to the shape property first. Then the heap property is restored by traversing up the heap. The recursive traversing up and swapping process is called heapify-up. It is can be illustrated by the following pseudo-code:

1
2
3
4
5
6
Max-Heapify-Up(A, i):
parent ← (i - 1) / 2

if parent >= 0 and A[parent] < A[i] then:
swap A[i] and A[parent]
Max-Heapify-Up(A, parent)

The implementation goes as follows:

1
2
3
4
5
6
7
8
9
10
11
12
13
14
15
16
17
18
19
20
21
22
23
24
25
26
27
28
29
30
31
32
33
// maxheap.c file
static void maxheap_swap(maxheap h, int i, int j) {
assert(h && i >=0 && i <= h->cur_size && j >= 0 && j <= h->cur_size);
key_type tmp = h->array[i];
h->array[i] = h->array[j];
h->array[j] = tmp;
}

static void maxheap_heapifyup(maxheap h, int k) {
assert(h && k >= 0 && k <= h->cur_size);

while(k>=0 && h->array[k] > h->array[k/2]) {
maxheap_swap(h, k/2, k);
k /= 2;
}
}

void maxheap_insert(maxheap h, key_type key) {
assert(h);

h->cur_size += 1;
// make sure there is space
if (h->cur_size == h->max_size) {
maxheap_double_capacity(h);
}

// add at the end
h->array[h->cur_size] = key;

// restore the heap property by heapify-up
maxheap_heapifyup(h, h->cur_size);

}

The number of operations requried in heapify-up depends on how many levels the new element must rise to satisfy the heap property. So the worst-case time complexity should be the height of the binary heap, which is log N. And appending a new element to the end of the array can be done with constant time by using cur_size as the index. As a result, the total time complexity of the insert operation should be O(log N).

Similarly, next, let’s work on: extract the root from the heap while retaining the heap property in O(log N) time. The solution goes as follows:

  • Replace the first element of the array with the element at the end. Then delete the last element.
  • Compare the new root with its children; if they are in the correct order, stop.
  • If not, swap the element with its child and repeat the above step.

This similar traversing down and swapping process is called heapify-down. heapify-down is a little more complex than heapify-up since the parent element needs to swap with the larger children in the max heap. The implementation goes as follows:

1
2
3
4
5
6
7
8
9
10
11
12
13
14
15
16
17
18
19
20
21
22
23
24
25
26
27
28
29
30
31
32
33
34
35
36
37
38
39
40
41
42
43
// maxheap.c file
int maxheap_is_empty(maxheap h) {
assert(h);
return h->cur_size < 0;
}

static void maxheap_heapifydown(maxheap h, int k) {
assert(h);

while(2*k <= h->cur_size) {
int j = 2*k;
if (j<h->cur_size && h->array[j+1] > h->array[j]) {
j++;
}
if (h->array[k] >= h->array[j]) {
break;
}
maxheap_swap(h, k, j);
k = j;
}
}

int maxheap_findmax(maxheap h) {
if (maxheap_is_empty(h)) {
fprintf(stderr, "Heap is empty!\n");
abort();
}

// max is the first position
return h->array[0];
}

void maxheap_deletemax(maxheap h) {
if (maxheap_is_empty(h)) {
fprintf(stderr, "Heap is empty!\n");
abort();
}
// swap the first and last element
maxheap_swap(h, 0, h->cur_size);
h->cur_size -= 1;

maxheap_heapifydown(h, 0);
}

Based on the analysis of heapify-up, similarly, the time complexity of extract is also O(log n).

In the next section, let’s go back to the question raised at the beginning of this article.

The time complexity of building a heap

What’s the time complexity of building a heap? The first answer that comes to my mind is O(n log n). Since the time complexity to insert an element is O(log n), for n elements the insert is repeated n times, so the time complexity is O(n log n). Right?

We can use another optimal solution to build a heap instead of inserting each element repeatedly. It goes as follows:

  • Arbitrarily putting the n elements into the array to respect the shape property.
  • Starting from the lowest level and moving upwards, sift the root of each subtree downward as in the heapify-down process until the heap property is restored.

This process can be illustrated with the following image:

This algorithm can be implemented as follows:

1
2
3
4
5
6
7
8
9
10
11
12
13
14
15
16
17
18
19
20
21
22
23
24
25
maxheap maxheap_heapify(const key_type* array, int n) {
assert(array && n > 0);

maxheap h = (maxheap)malloc(sizeof(struct _maxheap));
if(h == NULL) {
fprintf(stderr, "Not enough memory!\n");
abort();
}
h->max_size = n;
h->cur_size = -1;
h->array = (key_type*)(malloc(sizeof(key_type)*h->max_size));
if(h->array == NULL) {
fprintf(stderr, "Not enough memory!\n");
abort();
}
h->cur_size = n-1;
for (int i=0; i< n; i++) {
h->array[i] = array[i];
}
// small trick here. don't need start the loop from the end
for (int i = h->max_size/2; i >= 0; i--) {
maxheap_heapifydown(h, i);
}
return h;
}

Next, let’s analyze the time complexity of this above process. Suppose there are n elements in the heap, and the height of the heap is h (for the heap in the above image, the height is 3). Then we should have the following relationship:

2h<=n<=2h+112^{h} <= n <= 2^{h+1} - 1

When there is only one node in the last level then n=2hn = 2^{h} . And when the last level of the tree is fully filled then n=2h+11n = 2^{h+1} - 1

And start from the bottom as level 0 (the root node is level h), in level j, there are at most 2hj2^{h-j} nodes. And each node at most takes j times swap operation. So in level j, the total number of operation is j2hjj*2^{h-j} .

So the total running time for building the heap is proportional to:

T(n)=j=0hj2hj=j=0hj2h2j T(n) = \displaystyle\sum_{j=0}^h {j*2^{h-j}} = \displaystyle\sum_{j=0}^h {j* \frac {2^{h}} {2^{j}}}

If we factor out the 2h2^{h} term, then we get:

T(n)=2hj=0hj2j T(n) = 2^{h} \displaystyle\sum_{j=0}^h {\frac {j} {2^{j}}}

As we know, j=0j2j\displaystyle\sum_{j=0}^{\infty} {\frac {j} {2^{j}}} is a series converges to 2 (in detail, you can refer to this wiki).

Using this we have:

T(n)=2hj=0hj2j<=2hj=0j2j<=2h2=2h+1 T(n) = 2^{h} \displaystyle\sum_{j=0}^h {\frac {j} {2^{j}}} <= 2^{h} \displaystyle\sum_{j=0}^{\infty} {\frac {j} {2^{j}}} <= 2^{h}*2 = 2^{h + 1}

Based on the condition 2h<=n2^{h} <= n , so we have:

T(n)<=2n=O(n) T(n) <= 2n = O(n)

Now we prove that building a heap is a linear operation.

Summary

In this article, we examined what is a Heap and understand how it behaves(heapify-up and heapify-down) by implementing it. More importantly, we analyze the time complexity of building a heap and prove it’s a linear operation.