How HTTP1.1 protocol is implemented in Golang net/http package: part two - write HTTP message to socket
Background
In the previous article, I introduced the main workflow of an HTTP request implemented inside Golang net/http package. As the second article of this series, I’ll focus on how to pass the HTTP message to TCP/IP stack, and then it can be transported over the network.
Architecture diagram
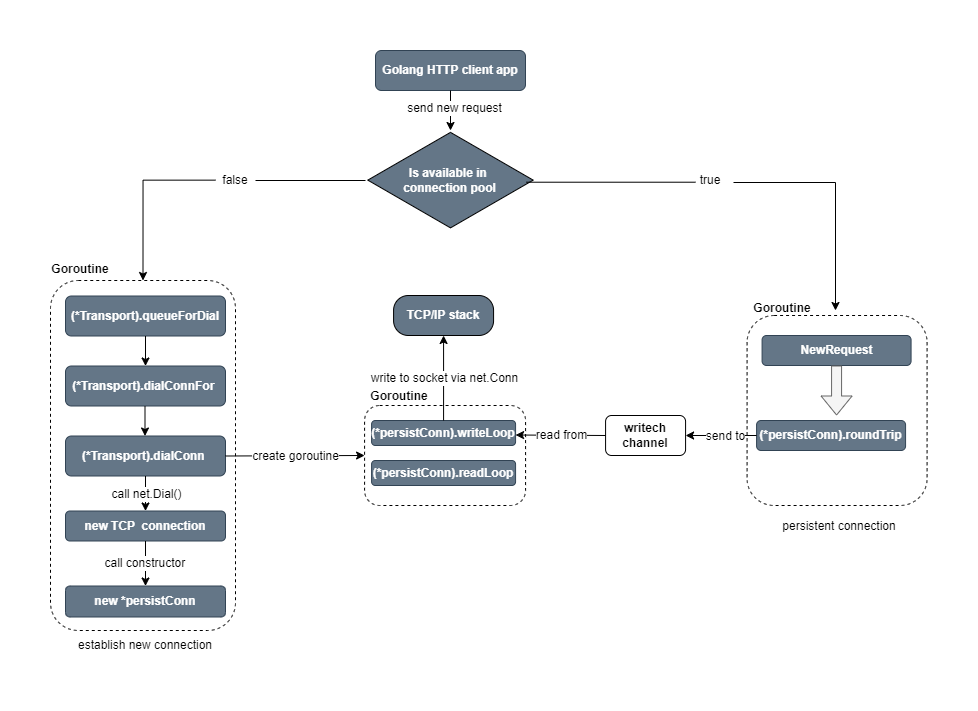
When the client application sends an HTTP request, it determines what is next step based on whether there is an available persistent connection in the cached connection pool. If no, then a new TCP connection will be established. If yes, then a persistent connection will be selected.
The details of the connection pool is not in this article’s scope. I’ll discuss it in the next article. For now you can regard it as a block box.
The overall diagram of this article goes as follows, we can review each piece of it in the below sections
persistConn
The key structure in this part is persistConn:
1 | type persistConn struct { |
There are many fields defined in persistConn, but we can focus on these three:
conn: type ofnet.Connwhich defines TCP connection in Golang;bw: type of*bufio.Writerwhich implementsbuffer iofunctionality;writech: type ofchannelwhich is used to communicate and sync data among different Goroutines in Golang.
In next sections, let’s investigate how persistConn is used to write HTTP message to socket.
New connection
First, let’s see how to establish a new TCP connection and bind it to persistConn structure. The job is done inside dialConn method of Transport
1 | // dialConn in transport.go file |
At line 4, it creates a new persistConn object, which is also the return value for this method.
At line 22 and line 46, it calls dial method to establish a new TCP connection (note line 22 handles TLS case). In Golang a TCP connection is represented as net.Conn type. And then the underlying TCP connection is bound to the conn field of persistConn.
Now that we have the TCP connection, how can we use it? We’ll skip the many lines of code and go to the end to this function.
At line 166, it creates bufio.Writer based on persistConn. Buffer IO is an interesting topic, in detail you can refer to my previous article. In one word, it can optimize the performance by reducing the number of system calls. For example in the current case, it can avoid too many socket system calls.
At line 171, it creates a Goroutine and execute writeLoop method. Let’s take a look at it.
writeLoop
1 | // writeLoop method in transport.go file |
As the function name writeLoop implies, there is a for loop, and it keeps receiving data from the writech channel. Everytime it receive a request from the channel, call the write method at line 10. Then let’s review what message it actually writes:
1 | // write method in request.go |
We will not go through every line of code in above function. But I bet you find many familiar information, for example, at line 37 it write HTTP request line as the first information in the HTTP message. Then it continues writing HTTP headers such as Host and User-Agent(at line 42 and line 56), and finally add the blank line after the headers (at line 86). An HTTP request message is built up bit by bit. All right.
Bufio and underlying writer
Next piece of this puzzle is how it’s related to the underlying TCP connection.
Note this method call in the write loop:
1 | // write method call in writeLoop |
The first parameter is pc.bw mentioned above. It’s time to take a deep look at it. pc.bw, a bufio.Write, is created by calling the following method from bufio package:
1 | // pconn.bw is created by this method call |
Note that this bufio.Writer isn’t based on persistConn directly, instead a simple wrapper over persistConn called persistConnWriter is used here.
1 | // persistConnWriter in transport.go file |
What we need to understand is bufio.Writer wraps an io.Writer object, creating another Writer that also implements the interface but provides buffering functionality. And bufio.Writer’s Flush method writes the buffered data to the underlying io.Writer.
In this case, the underlying io.Writer is persistConnWriter. Its Write method will be used to write the buffered data:
1 | // persistConnWriter in transport.go file |
Internally it delegates the task to the TCP connection bond to pconn.conn!
roundTrip
As we mentioned above, writeLoop keeps receiving reqeusts from writech channel. So on the other hand, it means the requests should be sent to this channel somewhere. This is implemented inside the roundTrip method:
1 | // roundTrip in transport.go file |
At line 48, you can find it clearly. In last article, you can see that pconn.roundTrip is the end of the HTTP request workflow. Now we had put all parts together. Great.
Summary
In this article (as the second part of this series), we reviewed how the HTTP request message is written to TCP/IP stack via socket system call.
How HTTP1.1 protocol is implemented in Golang net/http package: part one - request workflow
Background
In this article, I’ll write about one topic: how to implement the HTTP protocol. I keep planning to write about this topic for a long time. In my previous articles, I already wrote several articles about HTTP protocol:
- How to write a Golang HTTP server with Linux system calls
- Understand how HTTP/1.1 persistent connection works based on Golang: part one - sequential requests
- Understand how HTTP/1.1 persistent connection works based on Golang: part two - concurrent requests
I recommend you to read these articles above before this one.
As you know, HTTP protocol is in the application layer, which is the closest one to the end-user in the protocol stack.
So relatively speaking, HTTP protocol is not as mysterious as other protocols in the lower layers of this stack. Software engineers use HTTP every day and take it for granted. Have you ever thought about how we can implement a fully functional HTTP protocol library?
It turns out to be a very complex and big work in terms of software engineering. Frankly speaking, I can’t work it out by myself in a short period. So in this article, we’ll try to understand how to do it by investigating Golang net/http package as an example. We’ll read a lot of source code and draw diagrams to help your understanding of the source code.
Note HTTP protocol itself has evolved a lot from HTTP1.1 to HTTP2 and HTTP3, not to mention HTTPS. In this article, we’ll focus on the mechanism of HTTP1.1, but what you learned here can help you understand other new versions of HTTP protocol.
Note HTTP protocol is on the basis of client-server model. This article will focus on the client-side. For the HTTP server part, I’ll write another article next.
Main workflow of http.Client
HTTP client’s request starts from the application’s call to Get method of net/http package, and ends by writing the HTTP message to the TCP socket. The whole workflow can be simplified to the following diagram:
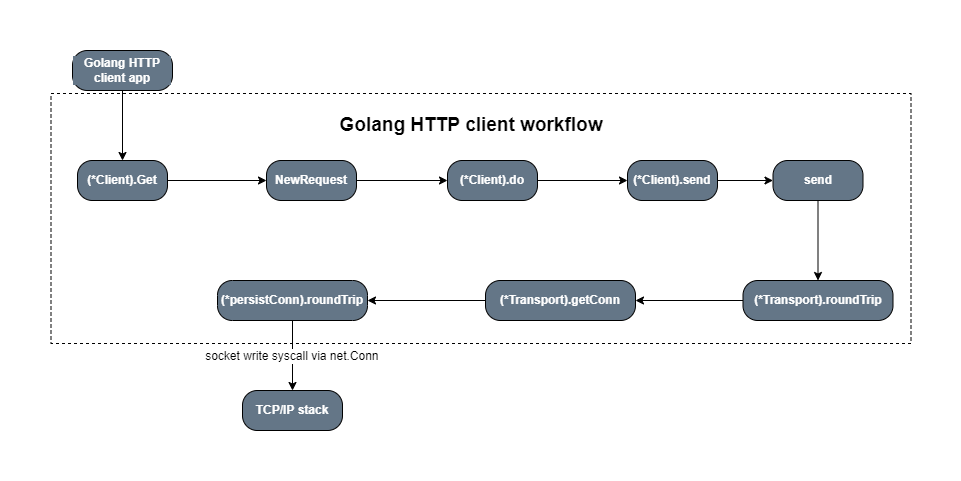
First, the public Get method calls Get method of DefaultClient, which is a global variable of type Client,
1 | // Get method |
Then, NewRequest method is used to construct a new request of type Request:
1 | func (c *Client) Get(url string) (resp *Response, err error) { |
I’ll not show the function body of NewRequestWithContext, since it’s very long. But only paste the block of code for actually building the Request object as follows:
1 | req := &Request{ |
Note that by default the HTTP protocol version is set to 1.1. If you want to send HTTP2 request, then you need other solutions, and I’ll write about it in other articles.
Next, Do method is called, which delegates the work to the private do method.
1 | func (c *Client) Do(req *Request) (*Response, error) { |
do method handles the HTTP redirect behavior, which is very interesting. But since the code block is too long, I’ll not show its function body here. You can refer to the source code of it here.
Next, send method of Client is called which goes as follows:
1 | func (c *Client) send(req *Request, deadline time.Time) (resp *Response, didTimeout func() bool, err error) { |
It handles cookies for the request, then calls the private method send with three parameters.
We already talked about the first parameter above. Let’s take a look at the second parameter c.transport() as follows:
1 | func (c *Client) transport() RoundTripper { |
Transport is extremely important for HTTP client workflow. Let’s examine how it works bit by bit. First of all, it’s type of RoundTripper interface.
1 | // this interface is defined inside client.go file |
RoundTripper interface only defines one method RoundTrip, all right.
If you don’t have any special settings, the DefaultTransport will be used for c.Transport above.
The DefaultTransport is going as follows:
1 | // defined in transport.go |
Note that its actual type is Transport as below:
1 | type Transport struct { |
I list the full content of Transport struct here, although it contains many fields, and many of them will not be discussed in this article.
As we just mentioned, Transport is type of RoundTripper interface, it must implement the method RoundTrip, right?
You can find the RoundTrip method implementation of Transport struct type in roundtrip.go file as follows:
1 | // RoundTrip method in roundtrip.go |
In the beginning, I thought this method should be included inside transport.go file, but it is defined inside another file.
Let’s back to the send method which takes c.Transport as the second argument:
1 | // send method in client.go |
At line 50 of send method above:
1 | resp, err = rt.RoundTrip(req) |
RoundTrip method is called to send the request. Based on the comments in the source code, you can understand it in the following way:
- RoundTripper is an interface representing the ability to execute a single HTTP transaction, obtaining the Response for a given Request.
Next, let’s go to roundTrip method of Transport:
1 | // roundTrip method in transport.go, which is called by RoundTrip method internally |
There are three key points:
- at line 70, a new variable of type
transportRequest, which embedsRequest, is created. - at line 81,
getConnmethod is called, which implements the cachedconnection poolto support thepersistent connectionmode. Of course, if no cached connection is available, a new connection will be created and added to the connection pool. I will explain this behavior in detail next section. - from line 89 to line 95,
pconn.roundTripis called. The name of variablepconnis self-explaining which means it is type ofpersistConn.
transportRequest is passed as parameter to getConn method, which returns pconn. pconn.roundTrip is called to execute the HTTP request. we have covered all the steps in the above workflow diagram.
Summary
In this first article of this series, we talked about the workflow of sending an HTTP request step by step. And I’ll discuss how to send the HTTP message to the TCP stack in the second article.
Understand how HTTP/1.1 persistent connection works based on Golang: part two - concurrent requests
Background
In the last post, I show you how HTTP/1.1 persistent connection works in a simple demo app, which sends sequential requests.
We observe the underlying TCP connection behavior based on the network analysis tool: netstat and tcpdump.
In this article, I will modify the demo app and make it send concurrent requests. In this way, we can have more understanding about HTTP/1.1’s persistent connection.
Concurrent requests
The demo code goes as follows:
1 | package main |
We create 10 goroutines, and each goroutine sends 10 sequential requests concurrently.
Note: In HTTP/1.1 protocol, concurrent requests will establish multiple TCP connections. That’s the restriction of HTTP/1.1, the way to enhance it is using HTTP/2 which can multiplex one TCP connection for multiple parallel HTTP connections. HTTP/2 is not in the scope of this post. I will talk about it in another article.
Note that in the above demo, we have fully read the response body and closed it, and based on the discussion in last article, the HTTP requests should work in the persistent connection model.
Before we use the network tool to analyze the behavior, let’s imagine how many TCP connections will be established. As there are 10 concurrent goroutines, 10 TCP connections should be established, and all the HTTP requests should re-use these 10 TCP connections, right? That’s our expectation.
Next, let’s verify our expectation with netstat as follows:

It shows that the number of TCP connections is much more than 10. The persistent connection does not work as we expect.
After reading the source code of net/http package, I find the following hints:
The Client is defined inside client.go which is the type for HTTP client, and Transport is one of the properties.
1 | type Client struct { |
Transport is defined in transport.go like this:
1 | // DefaultTransport is the default implementation of Transport and is |
Transport is type of RoundTripper, which is an interface representing the ability to execute a single HTTP transaction, obtaining the Response for a given Request. RoundTripper is a very important structure in net/http package, we’ll review (and analyze) the source code in the next article. In this article, we’ll not discuss the details.
Note that there are two parameters of Transport:
- MaxIdleConns: controls the maximum number of idle (keep-alive) connections across all hosts.
- MaxIdleConnsPerHost: controls the maximum idle (keep-alive) connections to keep per-host. If zero, DefaultMaxIdleConnsPerHost is used.
By default, MaxIdleConns is 100 and MaxIdleConnsPerHost is 2.
In our demo case, ten goroutines send requests to the same host (which is localhost:8080). Although MaxIdleConns is 100, but only 2 idle connections can be cached for this host because MaxIdleConnsPerHost is 2. That’s why you saw much more TCP connections are established.
Based on this analysis, let’s refactor the code as follows:
1 | package main |
This time we don’t use the default httpClient, instead we create a customized client which sets MaxIdleConnsPerHost to be 10. This means the size of the connection pool is changed to 10, which can cache 10 idle TCP connections for each host.
Verify the behavior with netstat again:

Now the result is what we expect.
Summary
In this article, we discussed how to make HTTP/1.1 persistent connection work in a concurrent case by tunning the parameters for the connection pool. In the next article, let’s review the source code to study how to implement HTTP client.
Understand how HTTP/1.1 persistent connection works based on Golang: part one - sequential requests
Background
Initially, HTTP was a single request-and-response model. An HTTP client opens the TCP connection, requests a resource, gets the response, and the connection is closed. And establishing and terminating each TCP connection is a resource-consuming operation (in detail, you can refer to my previous article). As the web application becomes more and more complex, displaying a single page may require several HTTP requests, too many TCP connection operations will have a bad impact on the performance.
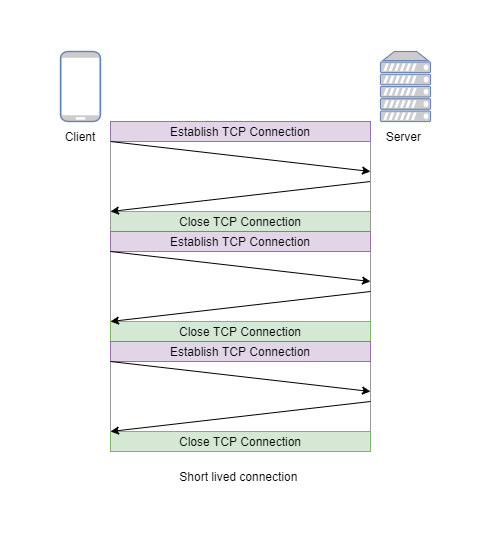
So persistent-connection (which is also called keep-alive) model is created in HTTP/1.1 protocol. In this model, TCP connections keep open between several successive requests, and in this way, the time needed to open new connections will be reduced.
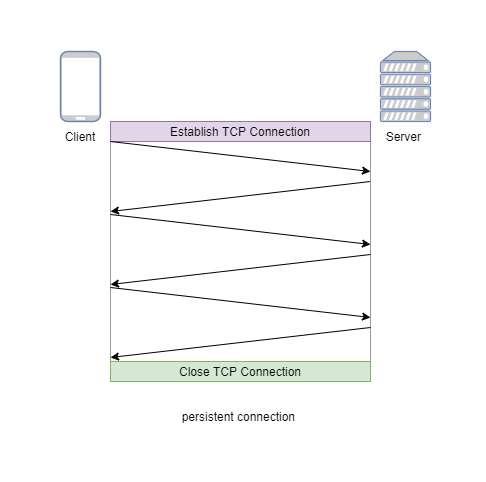
In this article, I will show you how persistent connection works based on a Golang application. We will do some experiments based on the demo app, and verify the TCP connection behavior with some popular network packet analysis tools. In short, After reading this article, you will learn:
- Golang
http.Clientusage (and a little bit source code analysis) - network analysis with
netstatandtcpdump
You can find the demo Golang application in this Github repo.
Sequential requests
Let’s start from the simple case where the client keeps sending sequential requests to the server. The code goes as follows:
1 | package main |
We start an HTTP server in a Goroutine, and keep sending ten sequential requests to it. Right? Let’s run the application and check the numbers and status of TCP connections.
After running the above code, you can see the following output:

When the application stops running, we can run the following netstat command:
1 | netstat -n | grep 8080 |
The TCP connections are listed as follows:

Obviously, the 10 HTTP requests are not persistent since 10 TCP connections are opened.
Note: the last column of netstat shows the state of TCP connection. The state of TCP connection termination process can be explained with the following image:
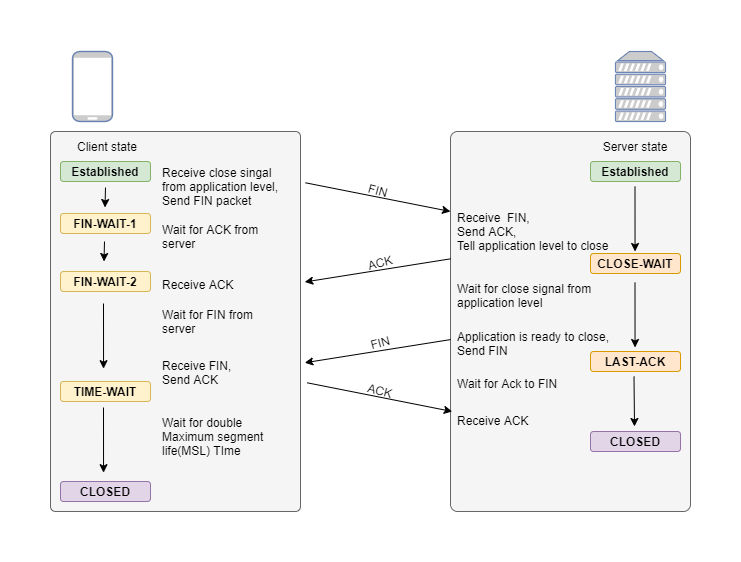
I will not cover the details in this article. But we need to understand the meaning of TIME-WAIT.
In the four-way handshake process, the client will send the ACK packet to terminate the connection, but the state of TCP can’t immediately go to CLOSED. The client has to wait for some time and the state in this waiting process is called TIME-WAIT. The TCP connection needs this TIME-WAIT state for two main reasons.
- The first is to provide enough time that the
ACKis received by the other peer. - The second is to provide a buffer period between the end of current connection and any subsequent ones. If not for this period, it’s possible that packets from different connections could be mixed. In detail, you can refer to this book.
In our demo application case, if you wait for a while after the program stops, and run the netstat command again then no TCP connection will be listed in the output since they’re all closed.
Another tool to verify the TCP connections is tcpdump, which can capture every network packet send to your machine. In our case, you can run the following tcpdump command:
1 | sudo tcpdump -i any -n host localhost |
It will capture all the network packets send from or to the localhost (we’re running the server in localhost, right?). tcpdump is a great tool to help you understand the network, you can refer to its document for more help.
Note: in our demo code above, we send 10 HTTP requests in sequence, which will make the capture result from tcpdump too long. So I modified the for loop to only send 2 sequential requests, which is enough to verify the behavior of persistent connection. The result goes as follows:

In tcpdump output, the Flag [S] represents SYN flag, which is used to establish the TCP connection. The above snapshot contains two Flag [S] packets. The first Flag [S] is triggered by the first HTTP call, and the following packets are HTTP request and response. Then you can see the second Flag [S] packet to open a new TCP connection, which means the second HTTP request is not persistent connection as we hope.
Next step, let’s see how to make HTTP work as a persistent connection in Golang.
In fact,this is a well known issue in Golang ecosystem, you can find the information in the official document:
- If the returned error is nil, the Response will contain a non-nil Body which the user is expected to close. If the Body is not both read to EOF and closed, the Client’s underlying RoundTripper (typically Transport) may not be able to re-use a persistent TCP connection to the server for a subsequent “keep-alive” request.
The fix will be straightforward by just adding two more lines of code as follows:
1 | package main |
let’s verify by running netstat command, the result goes as follows:

This time 10 sequential HTTP requests establish only one TCP connection. This behavior is just what we hope: persistent connection.
We can double verify it by doing the same experiment as above: run two HTTP requests in sequence and capture packets with tcpdump:

This time, only one Flag [S] packet is there! The two sequential HTTP request re-use the same underlying TCP connection.
Summary
In this article, we showed how HTTP persistent connection works in the case of sequential requests. In the next article, we can show you the case of concurrent requests.