Background
In the previous articles of this series, we examined how digital signatures and certificates make the TLS handshake process work. Generally speaking, this process is handled by platforms like web browsers. In this article, I want to demystify the process of TLS handshake by manual verification of SSL/TLS certificates step by step.
Certificate chain
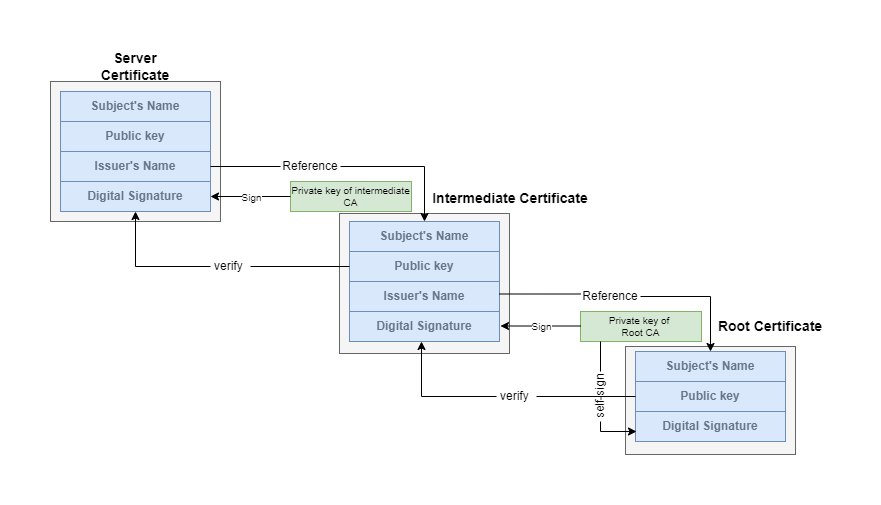
In this previous article, we mentioned that the server returns not one, but multiple certificates. These associated certificates form a certificate chain as follows:

The intermediate CA signs the server certificate, and Root CA signs the certificate of the intermediate CA (There can be multiple intermediate CAs). Pay attention to the subject and issuer names of each certificate, and you can notice that one certificate’s issue name is another certificate’s subject name. Certificates can find their CA’s certificate in the chain with this information.
For example, the following openssl command prints the certificate chain of google.com:
1 | openssl s_client -showcerts -connect google.com:443 |
The previous article explained that the chain contains three certificates. Let us extract the google.com server certificate into file google_com.pem and the intermediate CA certificate into file intermediate_ca.pem. These two files are the input data for this manual verification experiment.
Manual verification of SSL/TLS certificates
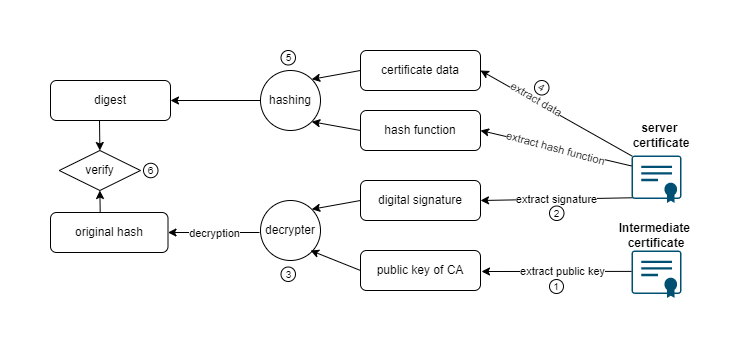
The entire process can be illustrated as follows:

Let us go through it step by step.
Extract the public key of intermediate CA
Since the certificate of the google.com server is signed with intermediate CA’s private key. The first step is to extract the public key of intermediate CA from its certificate.
1 | openssl x509 -in ./intermediate_ca.pem -noout -pubkey > ./intermediate_ca_pub.pem |
The content of file intermediate_ca_pub.pem goes as follows:
1 | -----BEGIN PUBLIC KEY----- |
You can look at the public key in PEM format (which is not readable to humans).
Extract the signature
Next, let us extract the digital signature of the google.com server’s certificate. This task is a little bit complex, and we need several Linux commands to form a data stream pipeline as follows:
1 | openssl x509 -in ./google_com.pem -text -noout -certopt ca_default,no_validity,no_serial,no_subject,no_extensions,no_signame \ |
openssl x509: extract the digital signature.opensslcommand supportscertoptoption, which allows multiple arguments separated by commas. The output of the first command should be:
1 | Signature Algorithm: sha256WithRSAEncryption |
grep -v: invert the sense of matching and select non-matching lines (because of -v option).Signature Algorithm: sha256WithRSAEncryptionis matched, but only the Hex code lines are selected based on the invert-match rule. The data stream after filtering should be:
1 | 76:6a:8a:d8:44:ac:14:40:92:36:f3:4a:b5:cb:54:36:67:c7: |
Note Signature Algorithm: sha256WithRSAEncryption means that the signature is signed with SHA-256 hash function and RSA encryption algorithm. When we need to re-compute the hash again, we must use the same hash function: SHA-256.
tr -d: delete the colons. The colons are to make it more readable. After removing the formatting colons, the output only contains Hex code.xxd -r -p: convert the Hex code into binary format and redirect to file certificate-signature.bin
Decrypt the signature
Now that we have both the digital signature and the public key of the intermediate CA. We can decrypt the signature as follows:
1 | openssl rsautl -verify -inkey ./intermediate_ca_pub.pem -in ./certificate-signature.bin -pubin > ./certificate-signature-decrypted.bin |
Store the decrypted signature in file certificate-signature-decrypted.bin. We can view the hash with openssl like so:
1 | openssl asn1parse -inform der -in ./certificate-signature-decrypted.bin |
The output is:
1 | 0:d=0 hl=2 l= 49 cons: SEQUENCE |
The hash is in the last line: 66EFBE4CEA76272C76CEE8FA297C1BF70C41F8E049C7E0E4D23C965CBE8F1B84.
Re-compute the hash
Now that we got the original hash of the certificate, we need to verify whether we can re-compute the same hash using the same hashing function (as mentioned above SHA-256 in this case).
The previous article explained that the digital signature is signed based on all of the information instead of only public key. We need to extract everything but the signature from the certificate.
We can extract the data and output it to file google_com_cert_body.bin as follows:
1 | openssl asn1parse -i -in ./google_com.pem -strparse 4 -out ./google_com_cert_body.bin -noout |
Note: you can refer to this openssl document to have a deeper understanding about the behavior of this command.
Finally, let us re-compute the hash with SHA256 as follows:
1 | openssl dgst -sha256 ./google_com_cert_body.bin |
The re-computed hash is 66efbe4cea76272c76cee8fa297c1bf70c41f8e049c7e0e4d23c965cbe8f1b84, which matches with the original hash. So we can get the conclusion that: the intermediate CA signs the goole.com server certificate.
Summary
In this article, we go through the verification process of SSL/TLS certificates step by step manually. I have to admit that the concepts of digital signatures and certificates are too abstract to understand, especially in the details. I hope the experiment, which carries out with certificates from the real world, can help you do that.
Reference
x509 Certificate Manual Signature Verification written by George Bolo.